Recipe: Perfect Roast Chicken

Here’s something really tasty and uplifting; the perfect roast chicken recipe with a smaller than usual carbon footprint.

Those of you who are environmentally conscious will love the fact that you turn the oven off halfway through the normal cooking cycle – and no, you don’t end up with a half-baked health hazard.

And if you’re thinking; “I’m definitely not using butter, it’s SO unhealthy”…get over it!

The French use butter in cooking all the time and they’re not unhealthy, so don’t be tempted to substitute butter with low fat alternatives such as – ‘I Can’t Believe Its Not Butter’ (Er, yes I can). Butter is essential for creating the fabulous fragrant juices that you’ll spoon over the end result.

Just don’t eat too much if it makes you nervous.

Note at the end….

Butter-Roast Chicken with Tarragon, Honey & Garlic.

Butter-Roast Chicken with Tarragon, Honey & Garlic.

CHICKEN ROASTED with HONEY, TARRAGON & GARLIC

(Serves 4 – 6)

Ingredients:

One 3 ½ lb / 1.6 kilo free range organic chicken

1oz / 29g of softened butter

2 tablespoons of clear honey

A sprig of fresh tarragon

2 cloves of garlic, finely chopped

Coarsely ground black peppercorns and sea salt

Action:

Preheat the oven to 350F / 180C

Stuff the chicken cavity with garlic and tarragon

Smear the skin of the chicken with the softened butter

Drizzle the honey over the chicken and sprinkle generously with sea salt and ground black pepper

Place the chicken in a roasting pan and roast for 45mins

Turn the oven off and leave the chicken inside for another 45mins

Do NOT be tempted to open the oven during the last 45mins

There you have it; a succulent fragrant chicken that’s best eaten warm with plain basmati rice and the juices spooned over. I like to serve it with a simple green Romaine /Cos lettuce salad with fresh herbs and a citrusy dressing.

Note:

Everything in the US seems big, bigger, biggest – so if you’re planning on doing this with a heftier chicken, use your calculator and adjust cooking times accordingly.

However, I’ve found that with a larger chicken you need to leave the oven on for slightly more that half the cooking time – for instance with a 4.5lb / 2kilo chicken I’d turn the oven off after about 70mins. Best if you can find a smaller chicken and follow this recipe precisely; that way you can’t go wrong.

Posted in Poultry | 3 Comments

The not-so-Smartphone

Smartphones operate at warp speed these days – I’d considered waiting until they increased from 4G to 11 before buying one but… while the cellphone I’ve used for the past 2 years is a sleek little item, texting is a major effort requiring a magnifying glass and a ton of techno-patience, neither of which I have.

So, two weeks ago I decided to upgrade to a Droid Smartphone.

I can’t tell you how excited I was when it arrived 48 hours later. It should have arrived 24 hours later but FedEx delivered it to the wrong address.

Anyway, following the instructions I charged the battery.

It came with a booklet full of helpful shortcuts and hints, none of which hinted at anything helpful.

I decided to download instructions online. An hour later my laptop crashed and the 3+MB manual hovered somewhere between computer and cyberspace.

I called Verizon to hear a cheerful message about long wait times and a suggestion to download instructions online. I re-dialed several times and eventually connected with a helpful human who was unable to help as all the steps I followed confirmed my un-activated status.

They apologized, suggested I visit a Verizon store and were unconcerned when I mentioned the battery needed recharging already.

Feeling still faintly cheerful and with battery recharged, I drove to the nearest dealership.

I found myself sitting in front of Smartphone multi-tasking Smartguy who simultaneously served two other customers. He transferred contacts, charged me extra to transfer pictures; sold me an expensive 2 year warranty that covers fire, flood, alien abduction, etc. and attached a nice snap-on protective cover the wrong way round.

However, he couldn’t set up my email and told me to contact my ISP. At this point I calculated that in the five hours I’d owned the phone, 3 and a half of those had been spent failing to activate it. Meanwhile, the battery threatened to die again.

I returned home and called ISP tech support; after 45 minutes in a holding pattern I gave up and tried their email ‘live-chat’. 15 minutes later someone typed ‘Hi, how are you today?’…then disappeared. This proved futile as they’re only allowed to spend 3 minutes chatting per desperate individual.

I called tech support once more and miraculously got a Smartperson who set up my email in seconds. Oh, joy!

Now I had email. But wait! The touch feature required 4-6 touches before responding. I tried light touch, firm touch, smack on the back of the head touch, all to no avail. A few seconds later it responded arbitrarily whereupon the battery promptly died.

Feeling increasingly Luddite-like, I set the alarm function and charged the battery before going to bed, only to be woken at 3:15am by an ugly noise warning me that the battery needed recharging.

I called Verizon again (from my home phone) and they confirmed the battery was a dud and would be replaced within 24 hrs.

So far, all I’d sent were 3 brief texts. A few people had called but I couldn’t hear a word.

24 hrs later I tried to install the replacement battery but the snap-on protective cover wouldn’t budge so I headed back to the dealer.

It took Smartphone Smartgirl 20 mins to remove it. The replacement battery was inserted and the phone got hot but wouldn’t launch. It finally fired up after two attempts and I learned that “…it’s OK for a phone to get hot as long as it doesn’t get too hot to hold”. Really?

I then sent 4 texts, read a couple of emails and recharged the now-dead new battery. I tried calling a couple of people but couldn’t tell whether they’d answered or not because I don’t have the finely tuned hearing of a bat.

As an aside, by now I’d received numerous salacious texts advising me on how to pick up men. Without my knowledge and according to Verizon, I’d signed up for a $9.99 pm service offering flirting advice….something I really need…not.

Still unable to make or receive calls and tired of charging the battery every 5 hours, this formerly excited Smartphone owner trudged back to the Verizon store.

On the door was a note: “Closed due to unforeseen circumstances”. It crossed my mind this was one of the best ski-days this season.

I drove 18 miles to another store.

After sharing my sorry story, the owner called Verizon tech support. A brief conversation confirmed that my Smartphone was in fact stupid and would be replaced in 5 business days. Excuse me? I’d purchased a 2 year Armageddon warranty so surely this warranted an overnight replacement?

Nope – not unless I’d dropped it from the eleventh floor of a condo building (which I happily would have, had I access to one) – no; replacements for ‘defective’ phones arrive by carrier pigeon.

Its now day 10 and I finally own a Droid that appears to work.

The irony of buying a superfast Smartphone being at odds with the length of time it took to get it working isn’t lost on me; I’m sure there’s a deep text message in there somewhere.

On the other hand, I hear Mercury is currently in retrograde.

Look out for my next posting; something that never fails: ‘The Perfect Roast Chicken’.

Posted in Etcetera - un-food-related posts | 2 Comments

Recipe: Dried Plums & Oranges in a Cardamom Tea Syrup

I thought winter was over; yesterday was 70F and sunny but today we have gale-force winds, horizontal blowing snow, thunder and lightning. That’s springtime in the Rockies for you.

This fragrant, fruity-spicy dessert is easy to make, rich tasting and perfect for blustery days – or any day, come to think of it.

That’s because it contains prunes.

If you’re tempted to stop reading at this point I implore you to continue; we Europeans understand how deliciously versatile prunes are because we don’t only associate them with our digestive health.

For instance, cognac-soaked prunes make an incredible filling for chocolate truffles (wait until next Thanksgiving/Christmas for that one) – and they have a great affinity for things as diverse as claret, amaretto, dried apricots and figs, marzipan, black tea, fresh oranges, ginger, apple juice and bacon. Rabbit with red wine and prunes is a wonderful French classic and it works very well with chicken if the idea of eating rabbit makes you weep.

Back to this recipe; there’s a particularly profound alchemy that occurs between prunes and black tea such as Earl Grey; something to do with the tannin in the tea. The end result is deliciously fragrant and will open your mind when it comes to the humble dried plum.

A final note – if you can find those orange-infused pitted prunes, they’re fabulous in this recipe but aren’t absolutely necessary.

prunes-and-oranges-in-cardamom-tea-syrup-0141

PRUNES and FRESH ORANGES in CARDAMOM TEA SYRUP

(Serves 4)

Ingredients:

4 smooth-skinned navel oranges

2 Earl Grey teabags

8 whole cardamom pods – cracked open a bit to expose the seeds

3oz / 75g of fine granulated white sugar

A dozen soft pitted prunes

Action:

Thinly strip the zest from one orange (avoiding white pith) with a potato peeler and add to the teabags in a measuring pitcher or ceramic bowl.

Pour over 18fl oz / 500ml of boiling water, infuse for 5 mins then remove the tea bags.

Add the cardamom pods to the tea along with the sugar. Stir and allow the sugar to dissolve.

Transfer to a small saucepan; bring to a boil and reduce by approx 1/3.

Put the prunes in a glass or ceramic dish and pour the hot tea syrup over them – cool and remove the orange zest.

Over a plate to catch the juices, cut the skin off the oranges starting with a slice off both ends – then with it standing on one end, slice off the skin and pith downwards in sections; cut off any remaining white bits then discard the skin and pith. Slice the oranges about ½ thick and add with accumulated juices to the prunes.

Allow it to sit covered for 2 – 24 hours at room temp – any longer and it needs to be refrigerated. Bring it back to room temp before serving on its own or over vanilla ice cream.

Posted in Desserts, Gluten Free Desserts, Vegan | 1 Comment

Recipe: Newspaper-Baked Trout with Lemon & Dill

Or to put it another way….’Fish in The News’.

Lovely whole (cleaned), fresh trout sit in the supermarket begging to be purchased and I bet most people pass them by thinking that dealing with the head, skin, and fins looks like work.

Newsflash!

Wrapping a whole cleaned trout in newspaper after stuffing the cavity with lemon (or lime) and herbs then baking it in the oven is not only drop dead easy, it yields a fragrant juicy result in 20-25 minutes and all the bother of skinning and decapitating will be taken care of by the newspaper as you unwrap it – all that stuff sticks to the paper and you’re left with a wonderful piece of succulent fish.

Yes, it’s still on the bone but it will lift off so easily that you can serve it as fillets or just serve it as-is to anyone with that particular skill.

Note: Eating fish is supposed to be good for your brain but wrapping it in the Wall Street Journal or Financial Times won’t make you any smarter, sorry.

Uncooked trout, blog

TROUT BAKED in a NEWSPAPER PARCEL

Ingredients:

One small to medium cleaned trout per person (unless its a whopper)

Fresh lemon and/or lime slices

Fresh tarragon or dill

Sea salt; freshly milled black pepper

One sheet of newspaper per fish

Action:

Pre-heat oven to 350F / 180C

Season the cavity and stuff each with sliced lemon or lime and fresh herbs.

On a flat surface, place the trout about ¾ of the way down the center of the newspaper page and tucking in the edges, roll up into a snug parcel.

Hold the parcel under cold running water until soaked through and gently squeeze out any excess.

Place on a roasting tray and bake in the preheated oven for 20-25 mins or until the newspaper has completely dried out. If you aren’t sure you can unwrap it a bit to check and if necessary, rewrap and give it another couple of mins.

Once the paper has dried out unwrap the parcel. The skin should adhere to the newspaper. Any little bits that don’t (plus the head) are easily slipped off using the flat side of a knife.

This isn’t like English ‘Fish n’ Chips’ so you probably won’t want to serve this in the newspaper (below) as it looks pretty ugly sitting there.

Leave the head behind and using a thin metal spatula, gently remove the body or if you prefer, remove the fillets from the backbone. Newspaper Baked Trout is great served warm with buttery baby new potatoes and something green.


Newspaper Baked Trout

Newspaper Baked Trout

Posted in Fish & Seafood | 7 Comments

Recipe: Moroccan Preserved Lemons

Here’s some sunshine in a jar for the first day of spring.

A jar of Moroccan preserved lemons makes a lovely gift and brightens up any kitchen. If you make them to give as gifts do the recipient a favor and give them a recipe to go with it. In the past I’ve given jars of preserved lemons to friends along with some recipe ideas without writing anything down; the lemons remained a mystery item that gradually darkened until they became sinister looking and despite verbal instructions, I suspect they were eventually thrown away.

On the basis that this only takes 5 minutes to prepare I’m going to include a recipe or two. If you’re into experimentation, preserved lemon is best used with chicken, lamb, pork or white fish such as halibut, swordfish and mahi-mahi. But hey – if you want to experiment with tenderloin of beef or calves’ liver, please let me know if the end result is worth sharing.

Preserved lemon is more of a condiment that anything else and you’ll need to eliminate or cut back on the amount of salt in any recipe you use them in.

Obviously, preserved lemon isn’t suitable for making desserts unless you like the idea of salty lemon meringue pie.

By the time they’re ready to use after 8-12 weeks, they’ll have taken on a darker, golden hue (see pic below) and once opened they must be kept in the fridge.

You’ll need a clean screw top or Kilner glass jar.

Notes at the end.

MOROCCAN PRESERVED LEMONS

Ingredients:

A quantity of smooth skinned, flawless lemons (Meyer lemons are ideal but not essential); enough to stuff your glass jar of choice.

Sea salt

Boiling water

Action:

Thoroughly clean the glass jar then put it in a warm oven while you prepare the lemons.

Gently rinse the lemons until they squeak and you’ve removed all the silly wax that supermarkets use to make fruit look shinier than nature intended.

From the pointy end, cut an ‘X’ in each lemon almost to the stalk end but not quite, so that they open up but stay attached. Sprinkle the cut insides with sea salt. I don’t measure this – a good sprinkle will do.

Pack them into your warm glass jar and push them down. Add a tablespoon of sea salt to the jar and slowly pour in boiling water until the lemons are covered. Push them down some more and if there are any large gaps, stuff salt-sprinkled lemon quarters in amongst the whole lemons to fill the jar. Cool and seal.

That’s it.

Set aside at room temp for 2-3 months or until they’ve taken on a golden hue – if you can remember this, give the jar a daily turn to swish the liquid about.

Once they’re ready you can use the entire lemon; skin, flesh, everything but the seeds. They’ll have taken on a softer consistency and the liquid can be used in dressings or sauces. Cut pieces out as you need them and mince finely or use in chunks such as for the chicken recipe below.

Here’s a recipe for Moroccan chicken with preserved lemons but first, a couple of other ways I like to use them:

It makes deliciously tangy coleslaw; dilute the mayonnaise with a small amount of the juice from the lemon jar then mix with your shredded cabbage etc., adding a teaspoon or so of finely minced preserved lemon and a sprinkle of caraway seeds to taste. No salt needed and you’ll use less mayo.

For an easy lemony Mediterranean fish dish:

Finely mince some red onion and scatter on the bottom of a baking dish; put the skinned fish fillet on top and add a few pitted kalamata olives (rinsed). Sprinkle with a combination of finely chopped garlic, parsley and preserved lemon; add a good grind of black pepper and a very generous drizzle of extra-v olive oil over the fish. Cover tightly with a lid or foil and bake at 325F / 163C for 30 mins or until the fish is just falling apart but not dry.

or…

Marinade some skewered shrimp with minced preserved lemon, jar juice, olive oil, black pepper and chopped fresh rosemary before throwing on the barbie. Or if you can get really good strong rosemary branches, just thread large shell-on shrimp straight onto the rosemary twigs for a really fabulous flavor.

Now for the very easy chicken dish – you can start this the day ahead:

MOROCCAN BAKED CHICKEN with PRESERVED LEMONS and COUSCOUS

(Serves eight to ten)

Ingredients:

8 large skinless, boneless chicken breasts; pref organic

For the marinade, whisk together the following:

¼ teaspoon cayenne pepper

1 teaspoon of powdered cinnamon

1 teaspoon of ground cumin

1 teaspoon of turmeric powder

2 cloves of garlic, crushed or finely minced

2 tablespoons of clear honey

¼ cup of freshly squeezed lemon juice

Add this to the chicken in a Ziplok bag(s) or glass dish and cover – make sure the chicken breasts are well coated and marinade in the fridge preferably overnight or for 4 hours minimum.

Ingredients continued:

8 quarters of preserved lemons

1 ½ cups or chicken broth/stock

1/3 cup of blanched, slivered almonds; dry toasted in a heavy skillet until golden and set aside

2 teaspoons of extra-v olive oil

1 smallish onion, finely chopped

1 small red chili – de-seeded and chopped

1 cup of couscous

1/3 cup of dried currants or golden raisins

To serve; 1/3 cup of chopped cilantro/coriander leaves

Action:

Pre-heat oven to 350F/180C

Remove the chicken from the marinade and reserve the marinade. Place the chicken and the preserved lemon wedges in a roasting pan then roast in the preheated oven for 20 minutes, or until cooked through and no longer pink in the middle – transfer to a serving plate; cover with foil to keep warm.

Wipe out the roasting pan with a paper towel to remove any fat – then working on the stove top, add the marinade and ½ cup of the chicken stock to the roasting pan – bring to a boil and stir for a few minutes until slightly thickened; set aside.

Heat the 2 tablespoons of olive oil in a large sauté pan over medium heat; add the onion and chili and sauté, stirring for 2-3 minutes or until very soft – add the remaining cup of stock and bring to a boil, turn off the heat then add the couscous; stir it well. Cover and set aside for 5 minutes or until all the liquid is absorbed. Once absorbed, fluff the couscous with a fork.

Add the reserved marinade from the roasting pan, almonds and currants or raisins to the couscous; stir gently over a low heat for 2 minutes or until all the liquid is absorbed. Turn off the heat.

To serve: thickly slice the chicken across the grain and arrange the slices on top of the couscous with the roasted preserved lemon wedges and a good scattering of chopped cilantro/coriander leaves.

Notes:

There isn’t a picture of the final dish because I couldn’t find ten people at the last minute to eat it in time for this blog so I didn’t make it.

I don’t know if this recipe freezes or not but I do know that if you’re running out of space in your fridge and a large jar of preserved lemons takes up too much room, you can finely chop them all and freeze with a little of the juice in ice cube trays. I did this out of desperation, not wanting to throw any away – it works.

If you know me and can’t wait 3 months to make this dish, you only have to ask – you can have some of mine 🙂

Posted in Sauces, Preserves, Condiments, Vegan | 7 Comments

Recipe: Oven Roasted Tomato Sauce

This is an outstandingly delicious sauce for pasta or any recipe that calls for tomato sauce. The slow oven roasting really concentrates the tomato flavor and the addition of honey creates a perfectly balanced finish. You can increase the garlic or chili to taste but I think the recipe below is just right.

Serve it on its own with capellini or spaghetti; with grated parmigiano reggiano, percorino romano or fresh mild goat cheese (montrachet) and/or finely shredded fresh basil leaves.

It also works wonderfully with lobster, shrimp or squid for pasta, or as a sauce for eggplant (aubergine) parmigiano.

It’s very easy to make and freezes beautifully so you can make a large batch at once. Prep time is a couple of minutes; cooking time is approx 2 hrs followed by some time using a sieve.

You’ll need a processor and a Mouli food mill or fine sieve.

Helpful notes at the end:

BLOG, Oven roasted tomato sauce 012

OVEN ROASTED TOMATO SAUCE

(Makes approx 1½ pints / 852ml of sauce)

Ingredients:

4 ½ lbs / 2 kilos of ripe tomatoes

1 whole small hot red chili

5 tablespoons of extra-v olive oil

1 tablespoon of clear honey

4 oz / 113.4g shallots of equal size; peeled and root ends trimmed

2-3 large garlic cloves, unpeeled

Sea salt and freshly milled black pepper

blog-oven-roasted-tomato-sauce-009.jpgAction:

Preheat oven to 325F / 170C

Halve the tomatoes around their ‘equator’ and place cut side up in a single layer in a shallow roasting pan. Stuff the whole red chili somewhere in the middle. Drizzle with the olive oil and honey, season with salt and pepper and roast for one hour.

After the first hour, tuck the peeled shallots and unpeeled garlic in amongst the tomatoes and baste with the accumulated juices. Put back in the oven for one more hour.

Remove from the oven and allow it to cool a bit. Squeeze the garlic cloves out of their skin and put in the processor with the shallots. Don’t do any processing just yet.

Discard the chili.

If you’re lucky enough to have a Mouli food mill, process the tomatoes to remove the seeds and skin; otherwise manually push through a sieve into a bowl. All of the wonderful roasting juices in the pan should be scraped out and added to the shallots and garlic in the processor, along with the sieved tomatoes… process and adjust salt and pepper to taste. That’s it.

Blog, roasted tom sauce with pastaNotes:

Tomatoes can be purchased ahead and allowed to ripen at room temp. I bought a tray of beefsteak tomatoes a week ago in Costco and they weren’t quite ripe. They sat on my kitchen counter and now they’re perfect.

Tomatoes will never ripen in the fridge as it halts the production of ethylene gas which is given off by the tomato and is a necessary part of the ripening process.

You can use a fresh red chili or a dried one depending on what’s available. I don’t know the names of all the varieties of chilies but I do know that the tiny pointy red ones from Thailand are eye-wateringly hot so use your judgment. The addition of chili doesn’t create a chili tomato sauce; its purpose is to add a certain indefinable something to the end result.

Don’t over-drain the pasta – throw it from the pan into a strainer then back into the cooking pan. Add the sauce and warm through. Some pasta cooking water will help distribute this or any other pasta sauce. If you’re cooking pasta for a cold dish you’ll need to rinse the pasta well in cold water then drain thoroughly.

Posted in Sauces, Preserves, Condiments, Vegan | 1 Comment

Recipe – Banoffee Pie

This recipe is well known in the UK but over here the name has people a bit confused. ‘Banoffee Pie’ draws its name from the combined ingredients of ripe bananas, dulce-de-leche, espresso and cream. The pie crust is made from Graham crackers (that’s a digestive biscuit crumb crust, to folks over The Pond).

It’s not particularly spectacular looking but take my word for it, the combination of flavors is incredible. Making dulce-de-leche is ridiculously easy and generates comments such as  – “You did what!?”

Dulce-de-leche takes a couple of hours to make this way, so you might as well make a few batches. The end result is also wonderful spooned over ice cream, brownies, or anything else that cries out for a touch of caramel.

Notes at the end:

BLOG Banoffee Pie 2.21.11 027

BANOFFEE PIE

(Serves six to 10)

Ingredients:

For the Graham cracker/biscuit crumb crust:

1 ½ cups finely ground graham cracker/biscuit crumbs – use a processor or smash the cookies to crumbs in a sturdy plastic bag with a rolling pin or empty wine bottle

1/4 cup white sugar

6 tablespoons of butter, melted

Optional – a pinch of cinnamon

Action:

Mix crumbs, sugar and melted butter until well blended. Press into an 8 or 9 inch pie plate or loose-based tart pan.

Bake at 375F (190C) for 7-8 minutes – cool.

Filling:

One unopened 14oz / 397g can of full fat sweetened condensed milk – tackle this ahead of time; see directions below

Two large ripe bananas

½ pt (284ml) of heavy/double cream

2-3 tablespoons of cold espresso/strong coffee

Action:

Here’s the interesting part; Place the unopened can of condensed milk in a very large pan of water to completely cover it. Bring to the boil and allow it to boil gently for 2.5 – 3 hrs. (Less time at sea level)

The label will float off. Keep a kettle of hot water on the side for topping it up and don’t walk the dog or do anything that takes you away from the kitchen for more than 45 minutes at a time, because if the water boils away the can will overheat and you’ll witness an explosion unlike anything your kitchen has ever seen; you’ll be scraping sticky goo and shards of tin off the ceiling for months.

After the allotted time, drain and allow the can(s) to cool completely.

Open the can and after admiring the alchemy, spread the toffee colored contents into your  crumb crust.

Thinly slice the ripe bananas all over the dulce-de-leche. Whip the cream with the cold coffee until peaks form. Smother the bananas with the coffee-infused whipped cream then chill for a couple of hours before serving.

Notes:

If you boil a few cans of condensed milk at once, I recommend re-labeling them once they’ve cooled because they’ll be stripped bare and a few months down the road you may think you’re opening your last can of cat food. There’s no need to refrigerate the boiled cans.

Don’t use low fat condensed milk – you need the regular full-fat variety.

If you buy a ready-made crumb crust and with your cans of boiled condensed milk, you’ll be able to whip up a great dessert in minutes.

When I say ‘ripe’ bananas, I don’t mean brown and mushy. They should be perfectly pale but soft and easy to slice.

Cinnamon is the most ubiquitous spice in the US – it seems to have permeated every cookie, cappuccino, candle, shopping mall, air-freshener and public restroom to the point that I’m suffering from cinnamon overload. However if you can’t live without it, add it to the crust but it’s perfect without it.

Don’t put sugar in the cream. There’s plenty in the dessert already.

I sprinkle praline on top just before serving but this is optional. The recipe for praline is in a previous blog; ‘Chocolate Peanut Butter Parfait’

Posted in Desserts | 1 Comment

Recipe: Spicy Italian Sausage & Porcini Ragout with Grilled Polenta

One of the things I miss most about living in the UK aside from the obvious, that being our glorious British climate; is the close proximity to the rest of Europe.

Gone are those days where a long weekend for me might have involved shopping, eating and sightseeing around Paris; sipping horchata and relaxing in front of a cafe in Ibiza or gorging myself on food such as this dish below, in Florence.

Nostalgia isn’t what it used to be but as it still generates longing, here’s a delicious Tuscan recipe that combines two of my favorite ingredients, porcini and polenta.

Making polenta is straightforward but takes a bit of muscle. On the other hand, you can choose to cheat and buy one of those plastic sausages of ready-made polenta or instant polenta mix in a box.

I prefer to make it from scratch (recipe below). I particularly like the thrill of the intermittent volcanic eruptions thrown up by the hot polenta – and the way my arms really ache after vigorously stirring the increasingly stiffening porridge for 20 mins.

However, its well worth this effort for a superior end result but if time is an issue and you’re afraid of burns, cheat. Or serve it with fettucini instead. Just as good but not quite as ‘Tuscan farmhouse’.

Vegetarians; leave out the sausage and increase the quantity of fresh mushrooms.

The usual notes at the end.

Polenta with porcini sauce 009

POLENTA with a WILD MUSHROOM SAUCE – ‘Polenta con ragu di funghi porcini’

(Serves six to eight)

Sauce ingredients:

1 ½ oz / 43g of dried porcini mushrooms

1lb / 454g sweet Italian sausage (pork or turkey) – preferably ones made with fennel seed

2 tablespoons of extra-v olive oil

1 med sized onion, finely chopped

1 med sized carrot, finely chopped or grated

1 stick of celery, finely chopped

6oz / 170g small portabella/brown chestnut mushrooms, sliced

¼ cup finely chopped Italian flat leaf parsley

One 28oz / 795g can of plum tomatoes with their juice, coarsely chopped

1 teaspoon of fresh rosemary, finely chopped

2 fresh sage leaves, finely chopped

Sea salt and freshly milled black pepper

To serve: the best quality parmesan (parmigiani reggiano); grated or shaved

Action:

Cover the dried porcini with very warm water and set aside for 20 mins.

Slice the sausages half an inch thick. In a heavy skillet over a medium heat, sauté the sausage slices in 2 tablespoons of olive oil stirring frequently until no longer pink. Remove with a slotted spoon and drain on paper towels.

Pour the porcini mushrooms and their soaking liquid through a paper towel-lined strainer; reserve the liquid, finely chop the mushrooms and add to the strained liquid. Set aside.

In the same skillet that the sausage was cooked in, gently sauté the onion, carrot, celery and parsley until softened (not browned) then add the sliced fresh mushrooms. Sauté until the mushrooms are cooked through. Add the fresh sage, rosemary and chopped canned tomatoes with their juice.

Simmer gently, uncovered for about 25 mins, then add the sausage and chopped porcini with their soaking liquid. Continue to cook uncovered for another 20 mins or so, until the sauce is very thick. Check for seasoning and add salt and pepper if necessary.

If you want to serve it over pasta, ignore the polenta recipe below and serve with freshly grated or shaved parmigiani reggiano and another scattering of chopped Italian parsley.

If you’re serving it with cheat’s polenta (the fat plastic sausage containing ready-made stuff), heat it any way you like – I recommend grilling, see below.

You don’t have to grill cooked polenta in a skillet but I prefer mine served that way…..so, for you cooks with time on your hands and strong biceps, continue:

POLENTA (enough for this recipe)

Bring 6 cups of water to a rolling boil, add 1 tablespoon of sea salt then reduce to a simmer.

Stirring constantly with a wooden spoon, slowly pour in 1½ cups of polenta (coarsely ground cornmeal). Keep up this stirring action for the next 20 minutes.

As it cooks, this will feel more and more like a workout for your arms and it will spit hot cornmeal at you so wear an oven glove on your stirring hand. Don’t stop stirring or lumps will form on the bottom.

You’ll end up with a thick porridge-like mass. Throw in about 2 oz / 56g butter and beat well. Taste a small amount to make sure there’s no gritty, uncooked cornmeal left and turn off the heat.

Either let it rest for a couple of minutes then turn onto a wooden board for cutting and serve it right away with the sauce on top…

or…

the way I prefer it; immediately pour the lot into an oiled, straight-sided baking pan; quickly smooth the top and allow to cool (Make it ahead to this point).

When you’re read to serve it, invert the cold polenta onto a cutting board and slice it into triangles or squares about ½ inch thick. Brush both sides with olive oil and grill in a very hot, ridge-bottomed grill pan until it bears grill marks on both sides.

You can do this with polenta-in-a-plastic-tube from the supermarket but pat it dry first as its very wet.

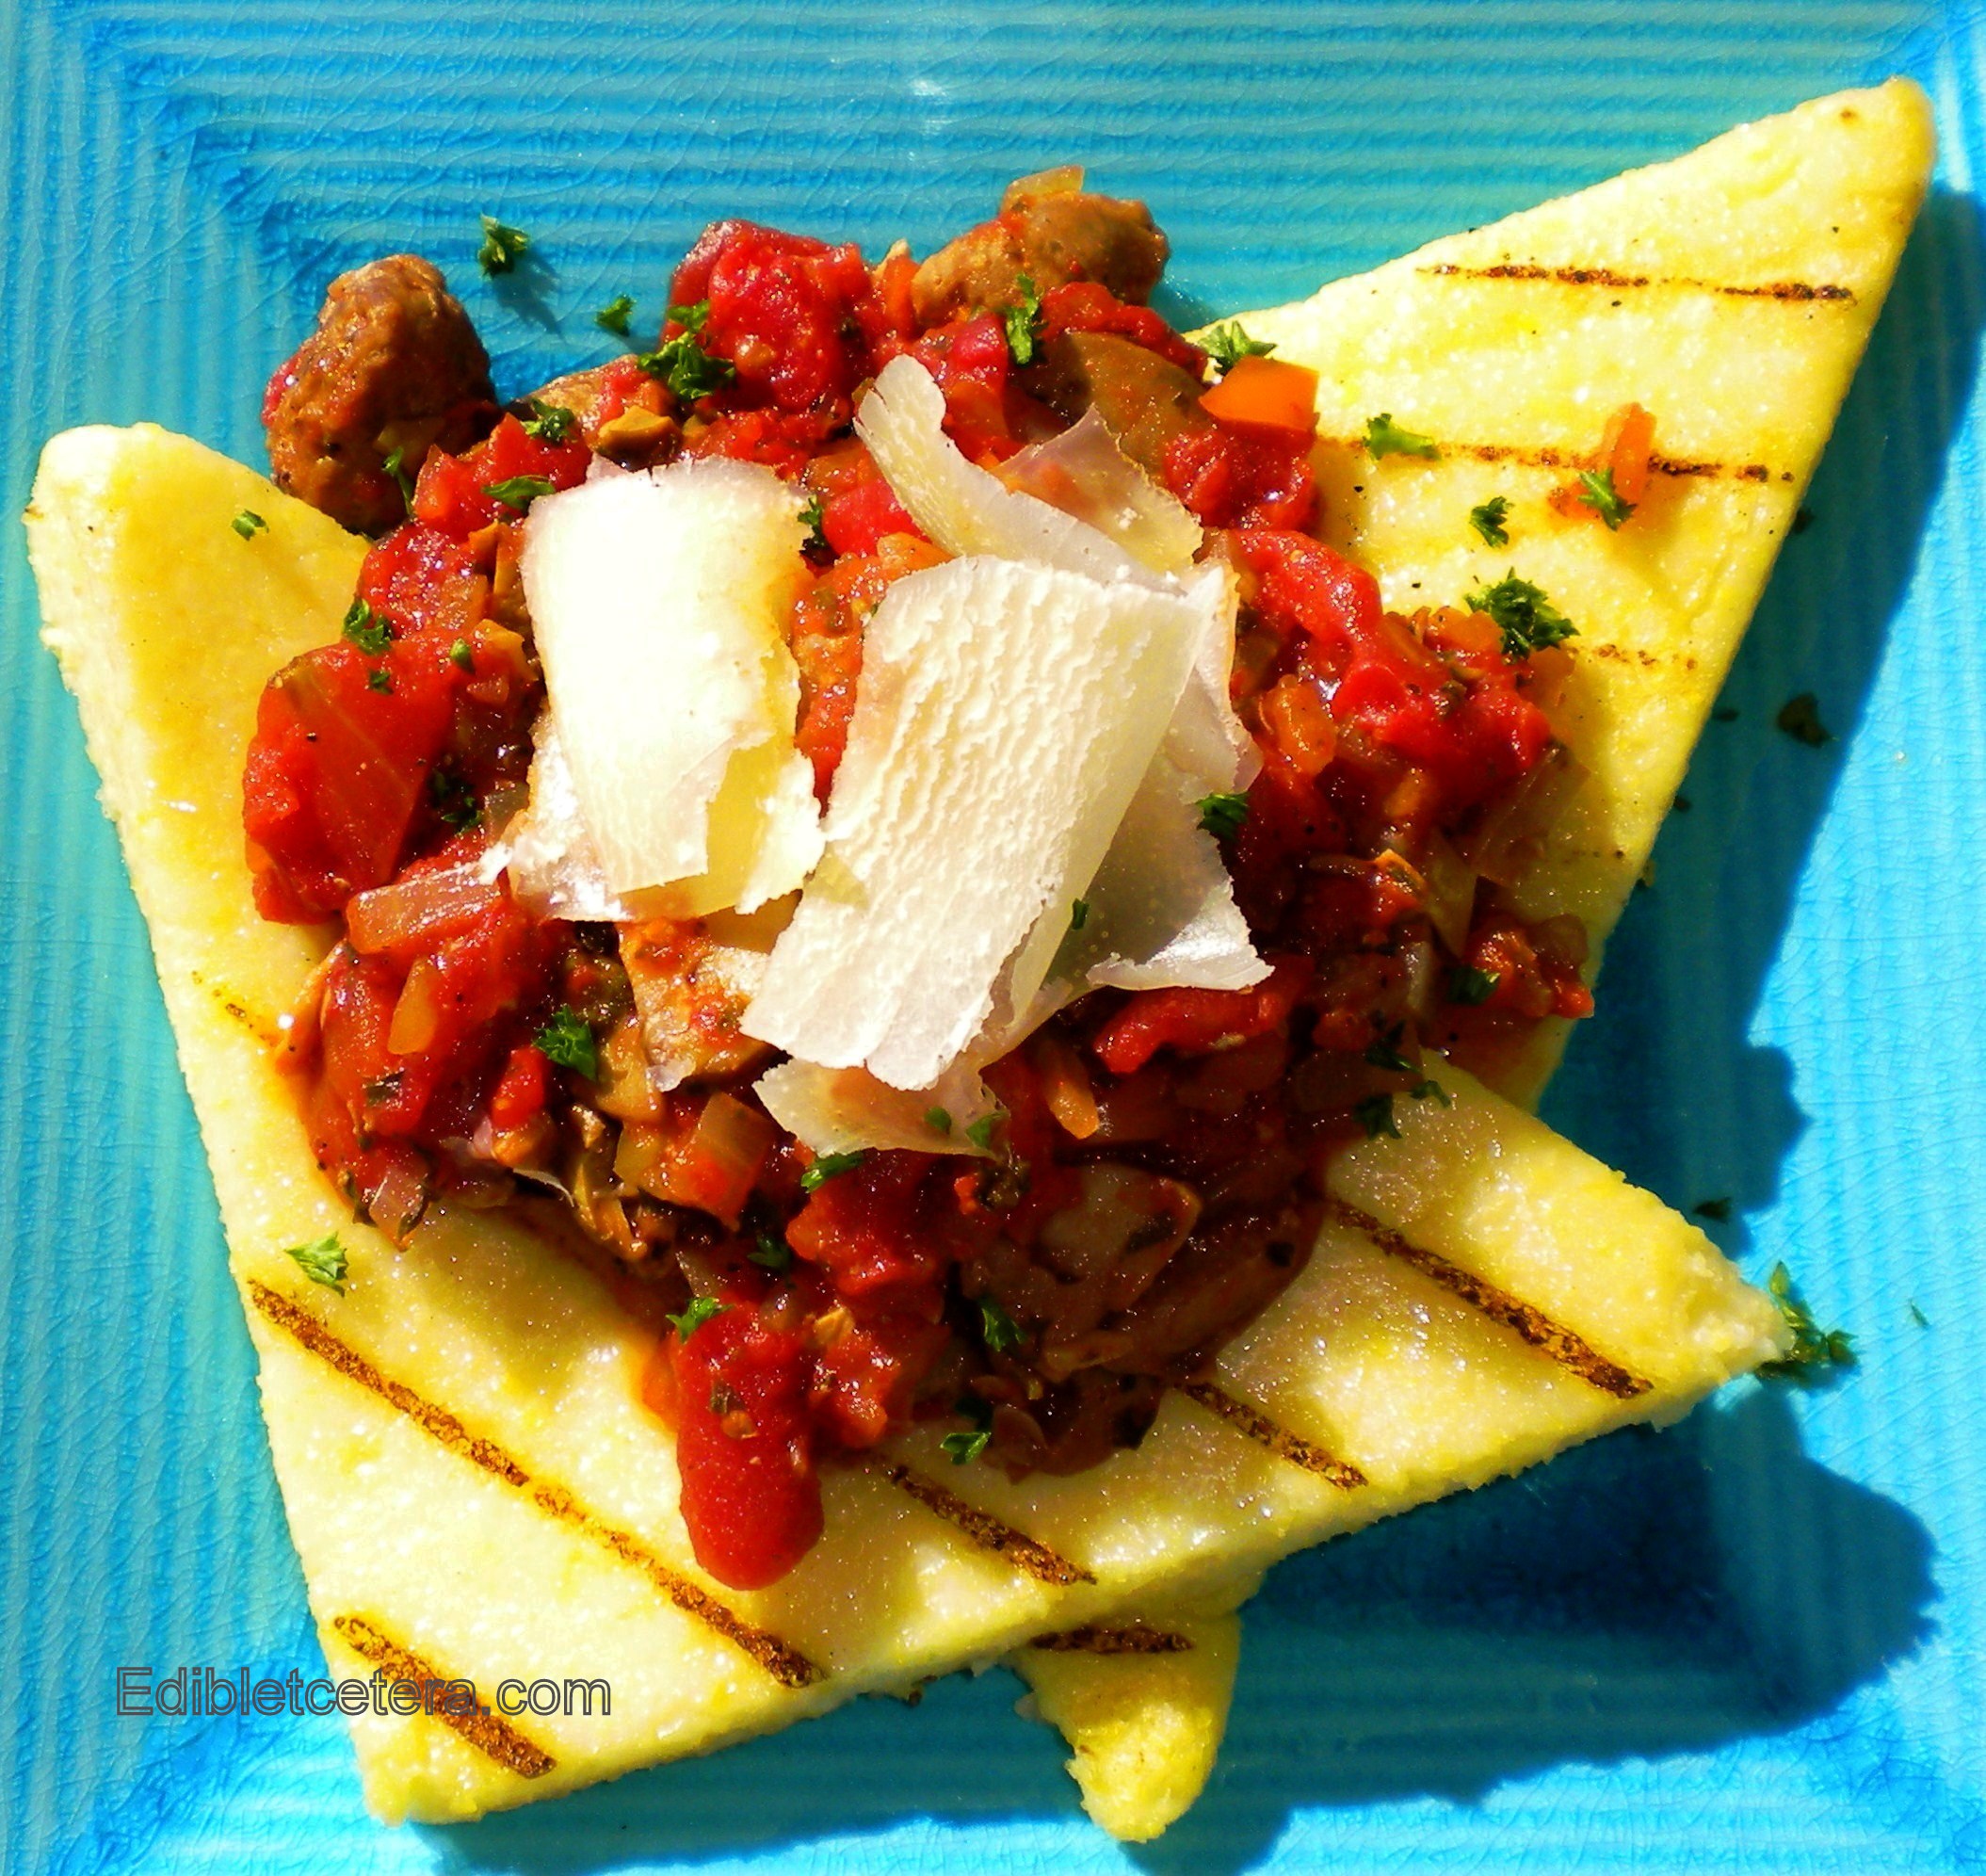
Arrange the grilled polenta on a plate, pile the mushroom sauce on top and serve with shaved or grated parmigiani reggiano and a sprinkle of chopped Italian parsley.

Notes:

Leftover sliced polenta will freeze, as will the sauce.

Dried porcini mushrooms are available in delis/good supermarkets.

As mentioned in a previous blog; if you know me and are nice to me I may give you some porcini from my personal stash – handpicked and dried by moi last August. However, I should point out that my supply is finite and if we don’t have what looks to be a promising 2011 season, this offer will be withdrawn.

I recommend being nice, regardless!

I used baby portabellas rather than the massive ones because they make the sauce darker and a bit sinister looking. Both taste good so it’s up to you.

I have one of those George Foreman lean mean grilling machines but it doesn’t get hot enough to create nice scorch marks on the polenta, so I use a cast iron ridge-bottomed grill pan. You can pick one up for under $20 in Wal-Mart but be aware it needs to be seasoned before you use it. Seasoning instructions come with the pan.

Whether you serve the sauce with pasta or polenta, buon appetito!

(Adapted from a Nancy Harmon Jenkins recipe)

Posted in Pasta | Leave a comment

Recipe: Vegan Chocolate Peanut Butter Parfait

I believe that chocolate and peanut butter were made for each other, a bit like champagne and strawberries, caviar and iced vodka, fish n’ chips, snails and garlic, my dog and I…etc.

This recipe tastes so deliciously rich and creamy, you won’t believe it contains no dairy – but it doesn’t, honest – and I’m a bit reluctant to say this because you might think; ‘Oh forget it – how very dull’ ….but it’s  100% Vegan.

The key is to make it a minimum of two to 24 hours ahead to allow the flavors to develop properly. It’s also pretty to look at and makes an impressive dinner party dessert – your guests won’t be able to guess the ingredients aside from the obvious. Because of it’s richness you can’t eat too much so I recommend serving it in small wine or martini glasses.

OK now to the point: it’s made with silken tofu and I promise that you’ll love it unless you don’t love the combination of chocolate and peanut butter. If that’s the case, you were probably deprived as a child. Silken Tofu also comes in a ‘Lite’ version with 1/3 less fat than regular silken tofu. I used ‘Lite’ tofu here but you really can’t tell the difference.

Ridiculously easy to make,  you will need a food processor. This recipes makes enough for 4 dessert servings and is just the right quantity to fill 30 tiny phyllo pastry cups; perfect for larger scale entertaining.

Note: I use organic peanut butter and Green & Black’s organic cocoa powder to create an intense-tasting dark chocolate layer. If you can’t find that, use the best quality Dutch-processed or raw organic cocoa powder you can find, such as Viva Labs non-GMO Organic Cacao.

If you love the combination of peanut butter and chocolate, try these gluten and dairy-free Peanut Butter Chocolate Chip Cookies, or this Chocolate Peanut Butter Mousse Cake – a huge crowd-pleaser.

At the bottom of the page there’s also a recipe for Praline; a delicious versatile alternative topping which is something I make in quantities and freeze.

CHOCOLATE PEANUT BUTTER PARFAIT

(Serves 4)

Ingredients:

One 12oz / 340g tetra-pak of silken tofu, firm or extra firm

1/3 cup of clear honey

1/3 cup of smooth peanut butter

2 teaspoons of pure vanilla extract

Pinch of sea salt

1/3 cup of best quality cocoa powder

Shaved or finely chopped best quality dark chocolate or praline (recipe below) to decorate

Action:

BLOG Choc Peanut Butter parfait 024In a processor, blend the tofu until smooth

Add the honey, peanut butter, vanilla and salt. Blend thoroughly. Set aside approx 1 cup

Add the cocoa powder to the remaining mix in the processor and blend well

Divide the chocolate mixture between 4 glasses and top with the un-chocolate mix you’ve set aside

Cover with cling film and refrigerate for at least 2 and up to 24 hrs

To serve: scatter with chopped chocolate and/or praline.

PRALINE

Praline is really versatile (the praline in my freezer is at least 12 months old and still tastes wonderful). It’s delicious beaten into whipped cream to serve with berries. Use it as a topping for cheesecakes or a chocolate pie.

It’s great sprinkled on ice cream especially vanilla, chocolate, or my personal favorite, Starbucks coffee ice cream. If you have an ice cream maker, add it at the end to enhance your favorite recipe or beat it into heavy cream for a really delicious nutty topping for pies and desserts. Keeping some praline in your freezer means you can elevate the mundane to the extraordinary at a moment’s notice.

To make Praline:

In a heavy pan, combine equal quantities of whole raw almonds (or hazelnuts) and white sugar. Melt the sugar over a very low heat. The nuts will begin to smell a bit toasty. This takes a while so don’t be tempted to crank up the heat.

Eventually the sugar will become a deep golden color and runny. When it reaches the runny stage, quickly pour the entire contents onto a large greased cookie sheet and allow it to cool and harden.

Once set, break it into smaller pieces then grind in a processor until it’s fairly fine.

Freeze in a sealed container. You can spoon it out as needed without a problem.


Posted in Desserts, Gluten Free Desserts, Vegan | 5 Comments

Recipe: Light and Luscious Carrot & Almond Cake

…and this recipe is wheat and dairy free so those of you who love the idea of carrot cake but can’t eat it, take heart! This incredibly moist and light version is so much better for your heart than the usual high fat cream cheese-smothered, heavy duty and multi-layered variety – and while it may not be quite as eye-popping without all that dairy frosting, I think it’s more elegant.

Dairyphiles might want to serve a big blob of whipped cream on the side, sweetened with a little powdered sugar and a splash of something like Grand Marnier or finely chopped orange zest.

Aside from hand grating the carrots (in my kitchen there’s no App for that), its dead easy to assemble… you’ll need a food processor.

Notes at the end…

BLOG Carrot and Almond cake 009CARROT & ALMOND CAKE

(Serves eight)

Ingredients:

8 oz/227g whole raw almonds

1/3cup (80ml measure) of dry breadcrumbs, plus 2 extra tablespoons (I make my own from wheat free bread such as spelt, etc)

5 large eggs

1 cup (240ml measure) of fine white sugar

8 oz/227g of finely grated carrots

2 tablespoons (30ml) of dark rum

1 tablespoon of baking powder

1 & ½ teaspoons of finely grated lemon zest

Pinch of sea salt

Action:

Pre-heat oven temp to 350F/177C

Line the base and sides of a 9 inch spring-form pan; lightly grease the pan and sprinkle the base and sides with 2 tablespoons of dry breadcrumbs.

Carefully process/pulse the almonds with 1/3 cup of dry breadcrumbs until finely ground…don’t overdo it or it will become a paste.

Whisk the eggs with the sugar until pale, fluffy and mousse-like.

Combine everything, folding gently into the eggs until well blended; pour the batter into the pan and place the pan on a cookie sheet to protect your oven from possible leaks.

Bake in the center of the oven for 50 mins or until a toothpick inserted into the middle comes out clean.

Cool completely in the pan on a rack.

Dust with some powdered sugar to serve.

Notes:

Instead of just dusting with powdered sugar I’ll sometimes make an icing glaze with pure lemon juice and drizzle that over the top; it soaks in a bit which is lovely.

Use organic products if you can; eggs, lemons, sugar, breadcrumbs from organic bread; carrots and almonds. As for the rum – any dark rum will do.

Please don’t use purchased breadcrumbs. Ugh. Make a batch of your own with a few slices of your favorite bread left out to dry for half a day or so. Break up and process until finely ground then store in a sealed container in your freezer.

I recommend unbleached parchment paper for lining baking pans.

I’ve no idea whether this freezes or not as there’s never been any left over to freeze.

Posted in Desserts, Gluten Free Desserts | 4 Comments