Recipe: Baked Gnocchi with Spinach & Cheese

If you’re craving comfort food and don’t feel like spending ages putting something together, here’s one of those easy, satisfying and delicious baked dishes that combines store-bought gnocchi, your favorite cheeses and fresh spinach.

Vacuum packed gnocchi is available from most supermarkets and I like to use the plain variety for this recipe but it comes in assorted varieties such as sun-dried tomato, spinach, garlic and gluten-free, so play around with it.

As for the cheese and based on what’s in my fridge, I’ve made this with English Stilton, fresh goat cheese, feta, Pecorino Romano and Parmigiano Reggiano. Soft fresh goat cheese and Parmigiano Reggiano is a great combination; use whatever you prefer but avoid the processed stuff and sprinkle the top with real Italian Parmigiano – it’s well worth the investment as it has more flavor and you’ll use less of it (unlike inferior varieties labeled ‘parmesan’ or worst of all, that ready-grated tasteless stuff posing as parmesan that comes in cardboard sprinkle-ready containers).

Depending on my mood, I’ll make the sauce with low fat or skim milk, or half and half/ thin cream – it works either way but it’s slightly more satisfying when made with cream.

This basic sauce recipe can be used for making lasagna and other baked pasta dishes; everything can be assembled ahead and kept covered in the fridge.

Baked Gnocchi with Spinach and Cheese

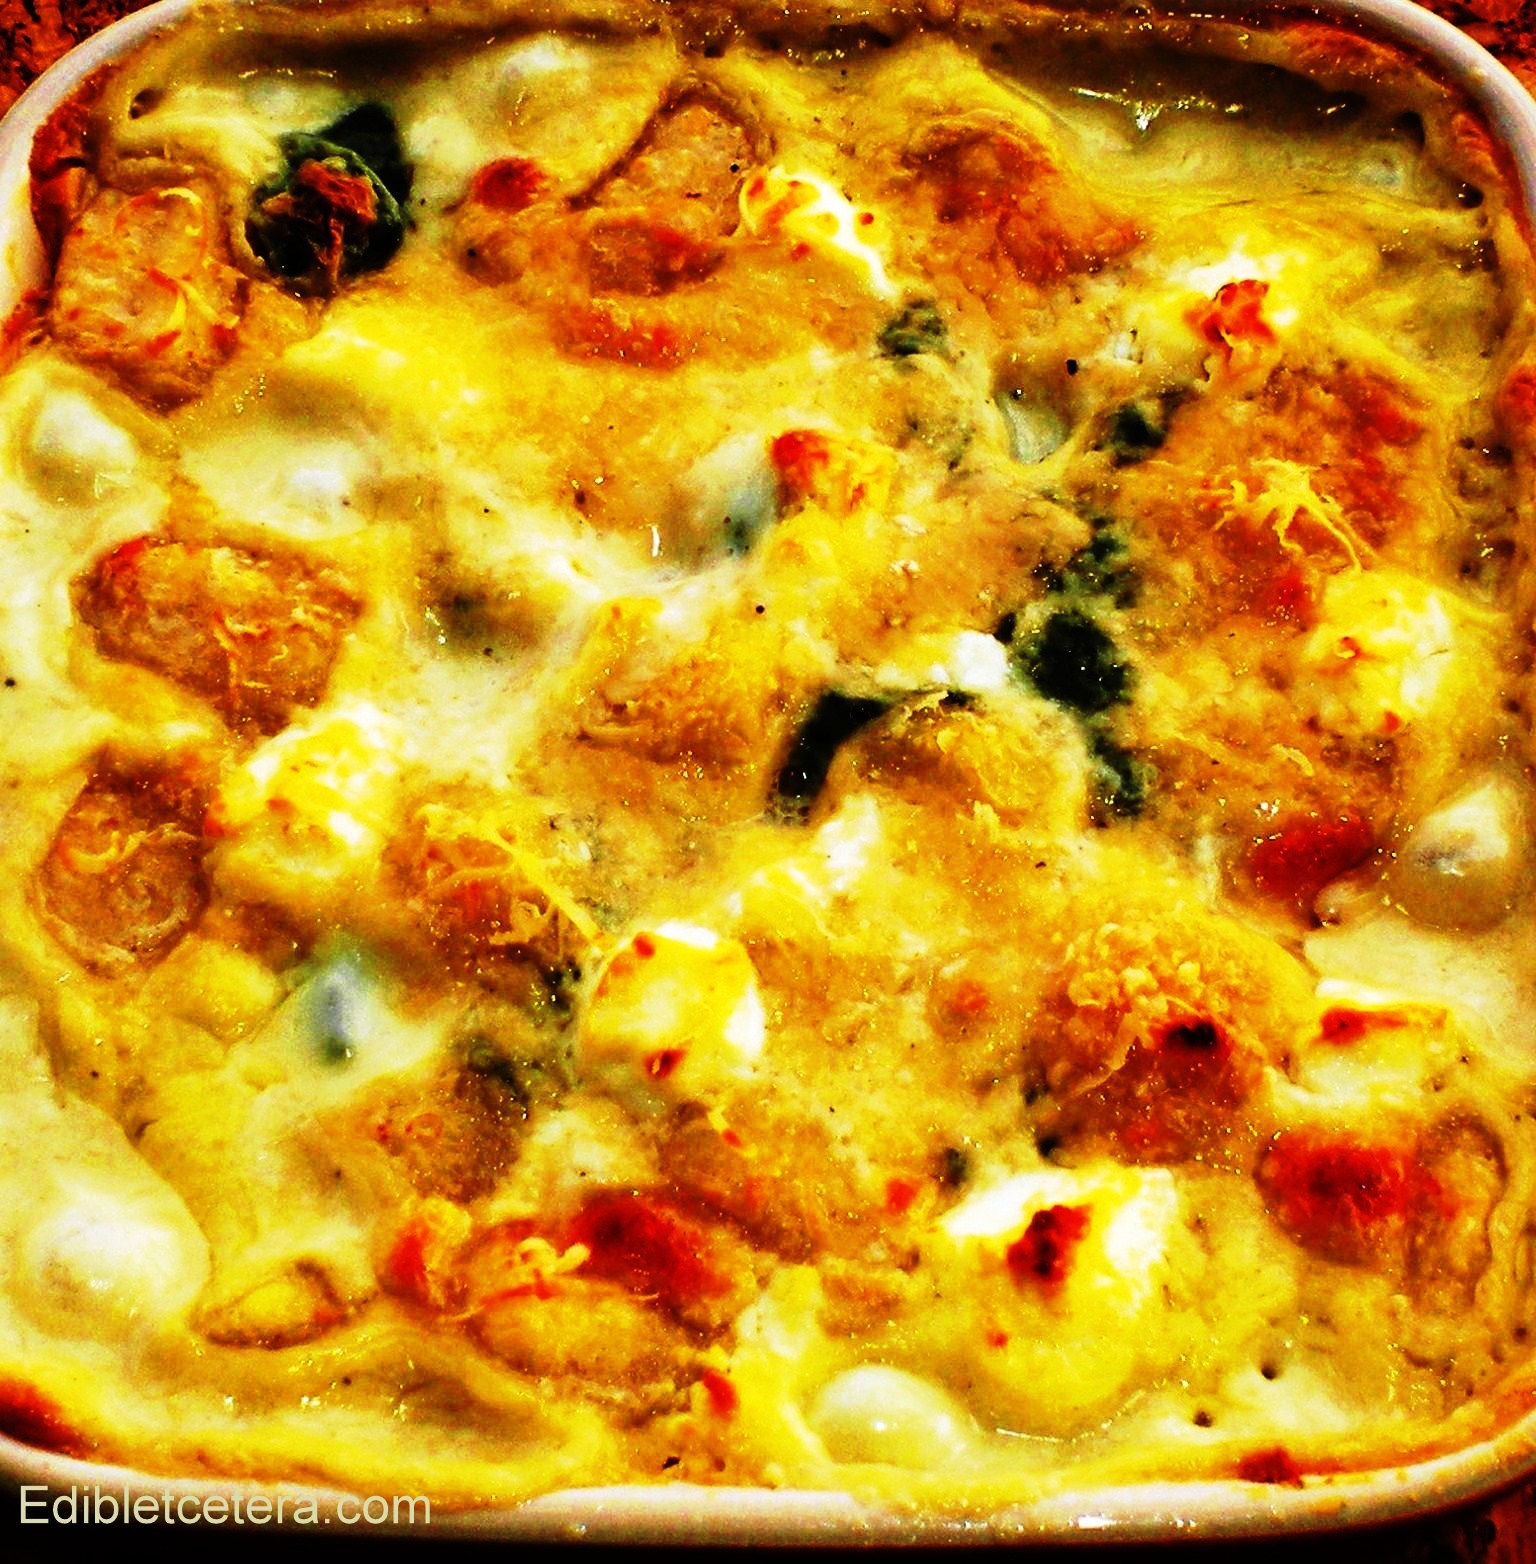
BAKED GNOCCHI with SPINACH and CHEESE

(Serves 2-4)

Ingredients:

One 17 oz (500g) pack of ready made gnocchi

Béchamel sauce (easy version recipe to follow)

4 good handfuls of ready washed baby spinach leaves

2-3 oz (57-85g) of your favorite cheese, diced, crumbled or grated

2 oz (57g) of freshly grated Parmigiano Regianno

For the quick white (béchamel) sauce:

1 pint (480ml) of skim milk/whole milk/half and half/thin cream

2 oz (57g) of plain/all purpose flour

2 oz (57g) of butter

1 bay leaf

A wedge of peeled fresh onion

A good grind of fresh nutmeg

Sea salt and freshly ground black pepper to taste

Action:

Pre-heat the oven to 375F (190C)

Butter a shallow quart / liter ovenproof dish and add the uncooked gnocchi, scattered with 3 oz of diced, crumbled or grated cheese.

Over a low heat, combine all the sauce ingredients together in a wide saucepan, whisking constantly to prevent lumps and to help melt the butter – bring slowly to a simmer and allow it to bubble gently for 2 minutes until thickened.

Turn off the heat and remove the onion and bay leaf. Immediately add half of the grated Parmigiano – give it a good stir and as soon as it’s melted, add the spinach and mix together well until the leaves have wilted.

Carefully pour the sauce with spinach over the gnocchi and cheese – gently combining everything until the gnocchi is well-coated.

Sprinkle the remaining Parmigiano Reggiano over the top and bake for 25-35 minutes or until golden and bubbling. Let it rest for a couple of minutes before eating.

Posted in Pasta, Vegetables / Vegetarian | Leave a comment

Recipe – Spiced Fig Loaf

This fig loaf is so robustly healthy, so low in fat and so good for you that you might want to do what I do, which is to slather it in butter.

Not the prettiest slice of cake but incredibly moist and delicious with or without butter – and besides being a great energy snack, it’s the perfect accompaniment to a nice cup of tea!

The tiny fig seeds give it a pleasing crunch and if you can manage not to eat it immediately, it tastes even better the following day and keeps well in the fridge for up to a week. Or freeze it.

If you can’t tolerate wheat flour then substitute gluten free or spelt or whatever you prefer. I don’t recommend whole wheat as this is dense enough without adding extra fiber. You can also substitute 1/3 of the flour in the recipe with ground almonds to create extra moistness.

SPICED FIG LOAF

(Makes two 9 inch loaves, or approx 24 slices)

Ingredients:

1/3 cup (79 ml) of fresh orange juice

¼ cup (59 ml) of dark rum – one of those mini-bar minis will do

12 oz (340 g) of dried figs, stalks cut off

1 1/3 cups (160 g) of soft brown sugar

1 cup (250 ml) of applesauce

½ cup (125 ml) of fat-free plain yoghurt

2 tablespoons of canola, grape-seed or sunflower oil

4 egg whites, lightly beaten

2 cups (340 g) of all-purpose / plain flour

1 teaspoon of bicarbonate of soda

½ teaspoon of baking powder

1 ½ teaspoons of ground cinnamon

1 teaspoon of ground ginger

¼ teaspoon of freshly grated nutmeg

¼ teaspoon of ground cardamom

1/8 teaspoon (pinch) of ground cloves

A pinch of salt

Action:

Gently warm the orange juice and rum; turn off the heat, add the dried figs and allow them to soften for 20 minutes.

Pre-heat the oven to 350F (180C).

Puree the figs and their soaking liquid in a food processor. Add the sugar, applesauce, yoghurt, oil and egg whites – blend.

Sift all the remaining ingredients together into a large mixing bowl.

Fold the wet ingredients into the dry and stir just enough to mix.

Lightly oil two 9 inch loaf pans and dust with flour, knocking out any excess.

Divide batter between the two pans and bake for 50 minutes, or until a skewer inserted into the middle comes out clean.

Remove from the oven and cool in the pans for 10 minutes, then invert onto a rack to cool completely.

Wrap in foil to seal and keep in the fridge for up to 1 week.

Posted in Desserts | Leave a comment

Recipe: Roasted Winter Vegetables with Chestnuts & Stilton

Here’s something tasty that’s a great accompaniment for roast beef or pork and is unusual enough to make your vegetarian guests smile.

Roasting root vegetables with *chestnuts then tossing them in a lime dressing with a little crumbled Stilton cheese to finish, creates an unusual and delicious dish; perfect for these gloomy days of winter.

If you can’t find English Stilton cheese, use another firm blue cheese such as Roquefort. If you serve it on its own, offer some warm crusty bread on the side.

*Whole peeled chestnuts are available in good supermarkets in jars or cans.

BLOG roasted root veg with stilton and chestnuts 005

ROASTED VEGETABLES with CHESTNUTS & STILTON

(Serves 4 or 6 as a side dish)

Ingredients:

3 tablespoons of walnut or extra-v olive oil

4 large parsnips, peeled and quartered lengthways

4 large red skinned potatoes, each cut into 6 wedges

4 large carrots, scrubbed and halved lengthways

2 large red onions, peeled and cut into 6 wedges

8 oz (226g) of peeled whole chestnuts, roughly chopped

Juice of 1 lime

8 oz (226g) of crumbled blue Stilton cheese

Action:

Pre-heat the oven to 400F (200C).

Add 2 tablespoons of the oil to a shallow roasting pan and place in the hot oven for 5 minutes.

Carefully toss all the prepared vegetables in the hot oil, turning well to coat. Roast for 1 hour, turning 2 or 3 times, until golden and tinged brown at the edges.

Mix in the chopped chestnuts and roast for another 10 minutes.

Meanwhile, whisk the remaining tablespoon of oil with the lime juice and a little sea salt and freshly ground black pepper.

To serve – either divide between warmed serving plates or serve in a large warmed serving dish; scatter over the chopped Stilton and drizzle with the lime dressing.

Posted in Vegetables / Vegetarian | Leave a comment

Recipe: Champagne Chicken with Wild Mushrooms & Tarragon

It may seem a little over the top to pop open a bottle of bubbly just to use 1 and 1/4 cups (300ml) of it for poaching chicken breast, so I recommend inviting a friend or two over to help you drink the rest of the bottle while you assemble this luxurious dish. It requires virtually no prep and takes only 30 minutes from start to finish.

You can use prosecco instead of champagne; it’s a lot less expensive, equally delicious and what you don’t use will make a nice little *kir royale-style cocktail while your guests are waiting to eat (*just add a splash of your favorite fruit based liqueur). I’ve even made this with a crisp dry white wine – also delicious.

With regard to the mushrooms, choose any combination of chanterelles, morels, oyster mushrooms, maitake (aka ‘chicken of the woods’), brown beech, baby crimini/chestnut mushrooms or porcini if it’s hunting season, you know what you’re doing and you can find the perfect baby ones.

You’ll still have a tasty result using white button mushrooms but they’re a bit bland for this recipe, so be brave and go for those strange-looking fungi that come in small packages and are available from most good supermarkets. You’ll be rewarded with something more visually appealing and with better flavor. I don’t recommend using shitake as they tend to be rather chewy and add a flavor that’s reminiscent of musty old library books.

Crème fraiche is available in most good supermarkets. It’s a thick French-style, cultured cream that brings a lovely rich buttery, nutty flavor to sauces and soups – or simply dollop some on top of a bowl of fresh summer berries.

champagne tarragon  chicken with wild shrooms 003CHICKEN with WILD MUSHROOMS in a CHAMPAGNE SAUCE

(Serves 4)

Ingredients:

4 chicken breast fillets of equal size (preferably organic)

1 1/4 cups (300ml) of champagne or sparkling dry white wine

1 teaspoon of olive oil

1 teaspoon of butter

8-9 oz (240g) of assorted fresh wild mushrooms, wiped clean and any large ones sliced

2 tablespoons of crème fraiche

1 tablespoon of fresh tarragon, chopped

Sea salt and freshly ground black pepper

'shrooms, assorted 001Action:

In a wide sauté pan with a lid, place the whole chicken breasts in one layer and pour over the champagne or equivalent. Bring to a boil, reduce the heat and cover; simmer gently for 15-20 minutes until the chicken is cooked thoroughly.

Meanwhile, heat the butter and oil in a separate pan and sauté the mushrooms until starting to turn golden, turning occasionally. Strain the cooked chicken breasts, reserving the liquid; cover the chicken and keep warm.

Add the reserved poaching liquid to the mushrooms and allow it to bubble for approx 4 minutes. Reduce the heat and stir in the crème fraiche (or sour cream) and tarragon – simmer gently for a few minutes or until the sauce has thickened slightly.

BLOG chicken with champagne and wild mushrooms 011Season with salt and freshly ground black pepper to taste.

Slice each chicken breast diagonally into thick slices and arrange on four warmed plates; pour over the sauce and serve immediately.

Serve with a wild rice pilaf and some leafy greens on the side with a lemony dressing.


Posted in Made in Under 30 mins, Poultry | 10 Comments

Recipe: Rosemary, Lemon & Black Pepper Cookies

These may not be much to look at but they are the most impossibly delicious, fragrant, delicate little cookies and the addition of black pepper creates a lingering warmth. You can always reduce the amount of black pepper if you’re nervous about it but you should definitely include some.

These cookies are very delicate – mainly due to the large quantity of butter in the recipe but there’s no way round it; this amount of butter is essential if you want a melt-in-the-mouth little whisper of a cookie. They aren’t overly sweet; just the right balance of lemon and rosemary but make no mistake, this is a real cookie and not something you’d serve with cheese. And anyway, butter isn’t something to be afraid of – just ask any European.

The recipe calls for all-purpose (plain) flour but I used a combination of two thirds oat flour and one third almond meal as I don’t tolerate wheat well – they’re every bit as good either way and the best part is that you can make the dough well ahead and it will keep chilled in the fridge for 4 days or stick it in your freezer for later use. Likewise, the baked cookies will keep in an airtight container in the fridge for 4-5 days and they also freeze well.

I defy anyone not to want to gobble up the lot as soon as they’ve cooled and set, so you may want to slice and bake just a few at a time and freeze the remaining cookie dough for another day.

ROSEMARY & LEMON COOKIES with BLACK PEPPER

(Makes 20-30 cookies)

Ingredients:

1 ½ cups (375ml) of all-purpose / plain flour

¼ cup (50ml) of finely chopped fresh rosemary leaves

1 teaspoon (5ml) of coarsely ground black pepper (not ready ground – do it there and then)

½ teaspoon (2ml) of baking soda

½ teaspoon (2ml) of fine sea salt

1 cup / 2 sticks (250ml) of unsalted butter

Finely grated zest of half a large lemon

1 egg

Action:

Start by gently whisking together the flour, rosemary, salt and baking soda; set aside.

Beat the butter, lemon zest and sugar together until pale and light, then beat in the egg. Make sure its well blended then fold in the flour mixture with a wooden spoon until thoroughly combined.

Take a large piece of baking parchment and drop lumps of cookie dough at intervals so that you can roll it all up and form a log, approx 1 inch in diameter. Wrap tightly and re-shape if necessary to create an even log shape.

Refrigerate for a minimum of 3 hours, up to 4 days (or freeze).

When you’re ready to bake the cookies, pre-heat the oven to 350F (180C). Slice the chilled log of dough into rounds approx ¼ inch (5mm) thick. Place on baking parchment on a cookie sheet at least one inch (2.5cm) apart, as they’ll spread out quite a bit.

Bake for 8-10 minutes or until golden and set.

Allow to cool for 15 minutes then transfer to a rack to cool completely. They will be very fragile so handle them carefully.

Posted in Cookies & Edible Gifts, Gluten Free Desserts | 2 Comments

Recipe: Chocolate Hazelnut Torte

Just in case you haven’t eaten enough dessert over the past two weeks, here’s another of those wonderful flourless chocolate confections – the combination of toasted hazelnuts and chocolate creates an absolutely heavenly cake with just the right amount of nuttiness; one of my favorites and totally worthy of a mention here.

This cake freezes well or keeps in the fridge for about 4 days but bring it back to room temperature before serving. I decorated it with home made hazelnut praline and a scattering of edible gold dust for a festive look but you can use chopped roasted hazelnuts or just leave it plain.

Serve with or without a dollop of whipped cream on the side.

Chocolate Hazelnut Torte

Chocolate Hazelnut Torte

CHOCOLATE HAZELNUT TORTE

(Serves 6-8)

Ingredients for the torte:

6 oz (170g) of best quality chopped bittersweet or semi-sweet chocolate, chopped (or chocolate chips such as Ghirardelli)

4 oz (114g) of whole hazelnuts

2/3 cup (11 tablespoons), plus 3 more tablespoons of fine white sugar

4 oz (114g) of unsalted butter at room temp

5 large eggs, separated

1 teaspoon of vanilla extract

¾ teaspoon of salt

Ingredients for the glaze:

6 oz (170g) of best quality bittersweet or semi-sweet chocolate, chopped

½ cup (118ml) of heavy (double) whipping cream

Action:

Preheat the oven to 375F (190C). Butter a 9 inch (23cm) spring-form cake pan and line the base with a round of baking parchment. Butter the parchment and dust the inside of the pan with a little flour, knocking out any excess.

Melt the chocolate in a metal bowl set over a pan of barely simmering water, making sure the bottom of the bowl doesn’t come into contact with the water (Use a Pyrex glass pan so you can see what’s going on here). Stir until smooth, then cool.

Meanwhile, spread the hazelnuts in a shallow roasting pan and toast in the middle of the oven until they turn golden – about 7-10 minutes. Wrap them in a cloth and rub the skins off as much as possible. Don’t worry about any remaining stubborn bits of skin. Cool them completely.

Transfer the nuts to a food processor and add 3 tablespoons of sugar – grind until fine.

In a large bowl, beat together the softened butter with the remaining sugar until pale and fluffy. Add the egg yolks one at a time, beating well between additions. Beat in the salt, vanilla and melted chocolate. Finally beat in the hazelnut mixture and combine everything well.

In another bowl, beat the egg whites with a pinch of salt until they form stiff peaks. Using a large metal spoon, gently fold about a quarter of the whites into the cake mixture to lighten it, then continue with the remaining whites using a gentle cutting motion until everything is well blended.

Spread the batter evenly into the spring-form pan and bake in the center of the oven for 45-55 minutes, or until a toothpick inserted into the middle of the cake comes out with just a few crumbs sticking to it.

Cool completely in the pan on a rack then invert onto a serving plate – peel off the parchment.

Make the glaze:

Put the chocolate into a small metal bowl. Bring the cream to a boil in a saucepan and pour over the chocolate; stir until completely smooth and allow it to thicken for about 20 minutes.

Spread the glaze over the top and sides of the torte and garnish with chopped hazelnuts. Allow to stand at room temperature for about 2 hours until the glaze is set. Keep cool and covered loosely or freeze. Be sure to bring it back to room temp before eating.

Happy New Year!

Posted in Desserts, Gluten Free Desserts | 3 Comments

Recipe: Wild Mushroom Pâté with Walnuts and Glazed Cranberries

This is my last blog for 2011 – so I wanted to offer something festive looking that isn’t too rich, given the over-stuffed feeling most of us will be suffering from this month – a lovely wild mushroom and walnut pâté with glazed cranberries.

It’s suitable for vegetarians and pretty enough for a special cocktail party or as an appetizer for a festive dinner. The cranberries aren’t too sweet and make a great contrast to the delicate mushroom pâté.

Make it no more than 4 days ahead – Merry Christmas!

mushroom pate 003

WILD MUSHROOM & WALNUT PATE WITH GLAZED CRANBERRIES

(Makes 3 cups / 700ml)

Ingredients:

1 oz (25g) dried porcini mushrooms (available from Italian deli’s and good supermarkets)

2 tbsp olive oil

2 shallots, chopped

18 oz (500g) mixture of wild fresh mushrooms (or portabellas/chestnut mushrooms) cleaned and roughly chopped

2 garlic cloves, finely chopped

Sea salt and freshly ground black pepper

Juice of ½ a lemon (plus extra in case it needs it)

4.5 oz (100g) ricotta

2/3 cup (150ml) crème fraîche or sour cream

4.5 oz (100g) toasted walnuts, roughly chopped (8 minutes in a 375F/ 190C oven should do it)

2 tbsp fresh parsley – chopped

Action:

Put the porcini mushrooms in a small bowl and cover with boiling water. Leave to soak for 15 minutes, then drain. Squeeze out as much water from the mushrooms as possible and roughly chop them. (You can use the soaking liquid in a gravy or sauce).

Meanwhile, heat the oil in a large frying pan and sauté the shallots for 10 minutes over a low heat until soft and translucent. Add the fresh mushrooms to the pan, along with the porcini, garlic and a grind of salt and pepper. Cook over a moderate heat for 10 minutes or until the mushrooms are soft and lightly golden and all the liquid has evaporated. Cool.

Put the mushroom mixture into a food processor along with the lemon juice, ricotta and crème fraîche or sour cream – blend until smooth.

Finally add the toasted walnuts and pulse briefly. Fold in the parsley, taste and add more lemon juice, salt and pepper if necessary.

Spoon into a dish or individual ramekins; cover and chill until firm.

CRANBERRY GLAZE

9 oz (250g) of fresh or frozen cranberries

2 oz (60g) fine white/caster sugar

A splash of water

4 tbsp of redcurrant jelly

Action:

Put the cranberries in a pan and sprinkle with the sugar. Add a splash of water and cook over a low heat just until the sugar has dissolved. Increase the heat and cook for 3-4 minutes until the cranberries are tender but before the skins start to split. Gently strain the berries through a sieve and collect the juices.

In a separate pan, melt the redcurrant jelly with the reserved cranberry juices – don’t allow it to boil.

Arrange the cooled cranberries neatly on top of the mushroom pâté and brush thickly with the redcurrant glaze.

The pâté will keep for 3-4 days in the fridge.

Posted in Salads & Appetizers | 3 Comments

Recipe: Chocolate Grand Marnier Prune Truffles

Chocolate and prunes were made for each other so if you get cracking right away, you and whoever you share them with will be enjoying these incredibly scrumptious treats for Christmas – they also make a wonderful gift.

They’re not difficult to make but you do need to plan 6 -7 days ahead, as the first five days of macerating the fruit in alcohol is absolutely necessary. So take my word for it – they’re totally worth it, they look impressive and I bet nobody can guess what’s in them. Plus, you’re going to have so much fun licking all the chocolate off your hands after stage two…..

I like to decorate mine with a piece of walnut and/or a dusting of edible gold dust; if you can’t find edible gold dust and hate walnuts, they’re just as delicious plain, otherwise get creative and top them off with whatever appeals to you.

Merry Christmas!

choc-prune-truffls-and-cream-cheese-torta-with-pesto-004CHOCOLATE PRUNE TRUFFLES

(Makes approx 50)

Ingredients for the filling:

8 oz (250g) soft pitted prunes

4 fl oz (125ml) of any of the following – cognac, kirsch, Grand Marnier or calvados

9 oz (275g) of dark chocolate, chopped

8 fl oz (250ml) of heavy cream

2 oz (50g) of unsalted butter

Action:

Starting 5 days ahead, soak the prunes in the alcohol – keep covered.

After five days, place the chocolate, cream and butter in the top of a double saucepan or in a bowl over a pan of barely simmering water. Don’t allow the bowl to come in contact with the water. Stir until smooth and completely melted. Take off the heat and set aside.

Strain the prunes of any liquid and chop finely in a food processor – add two tablespoons of the soaking liquid (about all you’ll have), then add this to the chocolate cream mixture – cover and refrigerate for 24 hours.

The next day, line a large cookie sheet with baking parchment.

Take teaspoon-sized amounts of the chocolate-prune mixture and roll together quickly between your palms until you have a round ball – place on the baking parchment (see pic) and refrigerate for a minimum of 1 hour and up to 24 hours, before coating them.

Have fun licking your hands!

Ingredients for coating the truffles:

15 oz (450g) of dark chocolate, chopped

2 tablespoons of sunflower or grapeseed oil

Walnut pieces and edible gold dust for decoration (optional)

Action:

Carefully melt the chocolate as follows; bring a pan of water to the boil and turn off the heat. Put the oil and chocolate in a bowl and set it over the pan, making sure it’s a good fit and the bottom of the bowl doesn’t come into contact with the water. Cover the bowl with a lid or foil and leave until the chocolate has melted.

Give it a good stir and allow it to cool to about 95F ( 35C)

Working with small batches at a time while keeping the others refrigerated, drop each truffle into the melted chocolate to cover and then lift it out with a fork, scraping the fork on the side of the bowl to remove any excess.

Slide it onto another parchment-lined cookie sheet and before the chocolate sets, top with a piece of walnut.

Keep them refrigerated and eat within ten days, or freeze.

BLOG prune choc truffles 011

Posted in Cookies & Edible Gifts, Gluten Free Desserts | 2 Comments

Recipe – Rosemary Roasted Sausages & Potatoes

This is one of those hearty, economical recipes for when you want to rustle up something a bit special – a satisfying, tasty supper dish made with everyday ingredients.

I’m generally adverse to sausages as they fall into the category of ‘processed foods’ unless they’re a gourmet, additive-free variety.

Back in the UK, I was lucky enough to have a local village butcher (complete with striped apron, sawdust on the floor, an array of wild game hanging outside and who took orders in October for a Christmas Goose weighing no more than *9lbs, as they were barely hatched at that point) … who made his own sausages.

They were the best sausages I’ve ever tasted and since I no longer have access to his smoked duck, wild boar, venison and juniper or free range pork with quince, I rarely eat them these days.

However, you can use a good Italian-style sweet sausage made by ‘Boulder Sausage’ as they’re completely natural (or whatever takes your fancy if you live near a Wholefood’s) – but I won’t be held responsible for the end result if you use mass produced, nitrate-loaded, mystery meat **bangers in this recipe.

If you’re in the UK or Europe, you have excellent sausages, so have at it!

Notes:

Leave out the sausages for a great side dish to accompany grilled lamb or baked fish.

*If you buy a goose, the general rule of thumb is that any weight over 9 lbs (4 kilos) is fat, so if you’re feeding a crowd, order/buy more than one but be sure they don’t weigh more than 9 lbs each or you’ll be ladling hot fat out of the roasting pan every 15 minutes and there will be less meat to go around.

** Banger is a British term for sausage.

BLOG sausages roasted with rosemary potatoes and tomatoes 003

ROSEMARY ROASTED SAUSAGES with POTATOES & CHERRY TOMATOES

(Serves 4)

Ingredients:

1 tablespoon of extra-v olive oil

8 best quality pork or turkey sausages

1 large mild onion such as Vidalia; peeled and sliced into thin wedges

1 pack (18g) of fresh rosemary

1 lb (450g) of baby potatoes, scrubbed and cut into four wedges

10 oz (250g) of cherry tomatoes, washed

Freshly ground black pepper

Action:

Preheat the oven to 425F (220C). Place the olive oil and onion wedges in a medium sized roasting pan and mix well. Cook for 15 minutes.

Reduce the oven temp to 400F (200C). Add the sausages; break up the rosemary into small twigs and add to the sausages along with the potato wedges. Toss everything to coat.

Roast for another 25-30 minutes turning the sausages and stirring everything a couple of times, until the potatoes are tender and starting to turn golden and the juices from the sausages run clear.

Scatter the tomatoes over everything and give a good grind of black pepper. Return to the oven for 10 more minutes and serve straight from the pan with something green on the side.

Posted in Meat | 2 Comments

Recipe – Pumpkin & Fresh Cranberry Bread

Yes – another recipe using pumpkin. Well, it is that time of year and now that fresh cranberries are available, I’ll be making this regularly until supplies run out.

You can also use frozen cranberries so you may want to stock up and freeze some for those months when they’re out of season. Likewise, stock up on canned pumpkin which has disappeared from supermarket shelves here by January.

This recipe is dairy-free and can also be wheat free if you switch the all-purpose (plain white) flour for spelt flour.

I don’t know why it’s called ‘bread’ because it’s really a cake and is lovely with an afternoon cup of tea. The end result is wonderfully moist and the whole cranberries pop in your mouth with a tangy burst.

If you’re an adventurous cook, it makes a fabulous base for a bread pudding; cut into 1 inch chunks and add a little fresh ginger to your custard sauce but strain it out before baking and serve with some cranberry caramel syrup (see previous recipe for Pumpkin Grand Marnier Cheesecake).

It makes a wonderful festive holiday gift and can be made up to 4 days ahead; keep it well wrapped in the fridge – it also freezes well, wrapped in a double layer of heavy duty foil.

Finally, you won’t get such a pretty result if you use brown sugar and whole wheat flour so stick to the recipe here.

PUMPKIN & CRANBERRY BREAD (CAKE)

Ingredients:

1 cup (237ml) of canned pumpkin, packed

1 cup (16 level tablespoons) of fine white sugar

¼ cup (59ml) of water

2 large eggs

¼ cup (59ml) of canola or grapeseed oil

2 cups (36 level tablespoons) of all-purpose (plain white) flour

2 teaspoons of baking powder

¼ teaspoon of bicarbonate of soda

½ teaspoon of salt

¼ teaspoon of ground cinnamon

¼ teaspoon of ground ginger

1/8 teaspoon of ground cloves

1 cup (237ml in measuring jug) of fresh cranberries, picked over and any stalks removed

Action:

Pre-heat the oven to 350F (177C)

Butter or oil a loaf pan measuring 8.5 x 4.5 x 2.75 inches (22 x 12 x 7cm)

In a large bowl using an electric whisk/mixer, beat together the pumpkin, sugar, water, oil and eggs.

Into this, sift the flour, baking powder, bicarb of soda, salt and spices and stir just until you have a smooth batter.

Fold in the cranberries and spoon into the loaf pan, spreading evenly.

Bake in the middle of the oven for 1hr 15 minutes or until a toothpick inserted into the center comes out clean.

Cool on a rack in the pan for 10 minutes then turn it out onto the rack to cool completely before wrapping and chilling.

Posted in Desserts | 8 Comments