Recipe – Rillettes of Pork (Pulled Pork) with Juniper, Thyme, Garlic & Bayleaf

To clarify; ‘pork rillettes’ is traditionally French and resembles a coarse pâté and should be eaten as such. In the US it would probably be referred to as ‘pulled pork’ but the difference is that rillettes is served at room temp and the cooking liquid is used to bind it together, hence the resemblance to pâté.

The most difficult part of making this dish (in my case), was finding the pork belly – If you live in a more populated area than I do, you probably won’t have the same challenge.  Neither the local supermarkets nor Whole Foods could oblige, which was a bit irritating as they all sell every type of bacon known to man.

Then a good friend pointed me in the direction of a Mexican butcher in Carbondale (Valley Meats on Hwy 133); they not only had plenty of pork belly but were still open at 9.30PM and were happy to cut to order. Gracias!

Either way, it’s best served with some warm crusty baguette or similar – perhaps with some gherkins/baby dill pickles on the side…or you could even stuff a baked potato with it and top it with some grated Gruyere.

Following my general rule of food prep, this is incredibly easy to make. You’ll need to pull the meat apart with two forks once it’s cool enough to handle but that’s the fun bit.

If you can’t find juniper berries, just increase the number of bay leaves to three. It freezes well.

BLOG Pork Rillettes

RILLETTES of PORK with GARLIC, JUNIPER, BAY & THYME

(Serves 8)

Ingredients:

2lbs (1kilo) of boned, skinned fresh pork belly

2 bay leaves

4 juniper berries, slightly crushed

3 large sprigs of fresh thyme

3 large cloves of garlic, peeled and left whole

1 tablespoon of sea salt

9 fl oz (250ml) of water

Action:

Blog Pork Rillettes,cooked
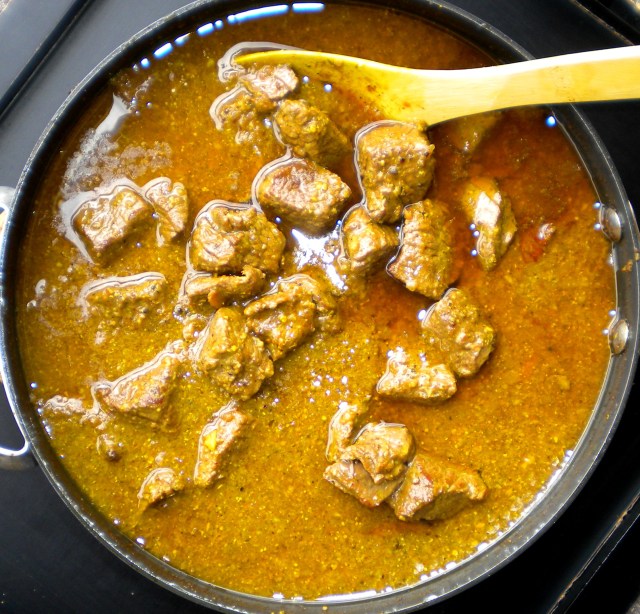
Preheat the oven to 320F (160C). Place the pork in a fairly deep roasting pan and rub it all over with the sea salt.

Add the bay leaves, juniper berries, thyme and garlic, then pour in the water.

Cover tightly with foil and cook for 3 hours or until the pork is tender.

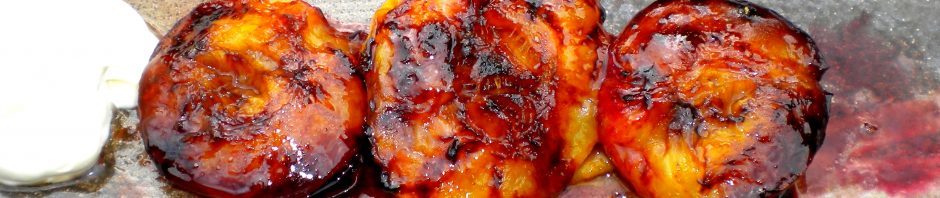
Remove from the oven and once it’s cool enough to handle, lift the meat out of the pan, retaining the juices. Using two forks pull/shred the pork apart. Pack the shredded meat into a pâté dish or terrine. Strain all the juices over the shredded meat, mix well then press it down firmly and refrigerate until it becomes firm.

And to those of you who cringe at the idea of eating pork fat – you eat bacon don’t you?

Welcome to French Cuisine!

Posted in Meat, Salads & Appetizers | 3 Comments

Recipe: Chocolate Chestnut Cake (Le Turinois)

I suppose I should have posted this recipe before the end of 2012 as I suspect many of you will be drinking blended kale, spirulina and spinach cleansing drinks this month.

I made it for New Year’s Eve and Le Turinois is a brilliant addition to anyone’s repertoire of special desserts.

This may not look much different from any other flourless chocolate cake but there are a couple of things that set it totally apart; first, the combination of chestnuts and dark chocolate is sublime – and secondly, it doesn’t require any baking.

The ingredients are a bit on the expensive side but the good news is that it’s incredibly easy to make and because it’s rich, a little goes a very long way.

Canned puréed French chestnuts only seem to be available between Thanksgiving and the New Year where I live (rather remotely), so I buy them in the UK where they’re less expensive and available year-round. Over here, any decent supermarket or Wholefoods will have them.

Another plus; this is one of those desserts that will taste better by day 3 or four, so make it in advance. It needs to be serve chilled and it freezes well.

BLOG Le Turinois 005

LE TURINOIS (CHOCOLATE CHESTNUT CAKE)

(Serves 8-10)

Ingredients:

4 oz (114g) of unsalted butter, softened

5 oz (142g) of superfine (caster) sugar

8 oz (227g) of good quality semisweet chocolate chips

1 lb (454g) of unsweetened chestnut purée

½ teaspoon of pure vanilla extract

2 tablespoons of espresso (optional)

Slightly sweetened whipped cream with shaved chocolate, praline, silver balls or whatever you like, for decoration

Action:

Line a loaf pan with baking parchment and lightly butter it.

Cream the butter and sugar together until pale and fluffy. Over a pan of barely simmering water, melt the chocolate. Make sure the bottom of the pan doesn’t come into contact with the water. Cool the chocolate for a few minutes then fold into the butter and sugar, along with the chestnut purée, vanilla and espresso (if using).  Blend thoroughly until smooth then pour into the prepared pan. Chill for a minimum of 48 hours and up to 4 days.

To serve: while chilled, use a hot knife to slice it thinly and serve it with cream on the side  – or, for a really impressive presentation, smother the whole thing in whipped cream and decorate with shaved chocolate or whatever you prefer.

It will still taste great by day 7, if there’s any left.

Posted in Desserts, Gluten Free Desserts | Leave a comment

Recipe: Classic French Onion Soup

Apart from one friend who has a major aversion to onions, I think most people would agree that a bowl of steaming hot French onion soup is heartwarming and delicious, especially at this time of year. The shot of brandy helps.

There are many versions of this classic soup; some call for chicken broth (vegetarians will use vegetable broth); some versions call for sherry rather than cognac; some have a plain crouton on the bottom as well as the cheese-covered one on top – and I’ve ordered it in supposedly good restaurants only to find some alternative, gluey and less aromatic cheese has been used in place of the traditional Gruyère. Worse, it’s frequently presented with the entire top and sides of the bowl dripping with an excessive rubbery blanket of palate-scorching melted cheese.

Which brings me to this point; I prefer not to scald the lining of my mouth, so I like to place the Gruyère -topped crouton at the bottom of the bowl and pour the hot soup over it…rest assured, the cheese will melt.

However and for the sake of visual impact, I’m presenting it here in a more familiar way. You can make your own minds up – here’s my favorite version and if you can’t face all those oniony tears, just make sure your knife is really well sharpened – that will cut back on the crying:

French Onion Soup

French Onion Soup

CLASSIC FRENCH ONION SOUP

(Serves 4)

Ingredients:

2 tablespoons of butter

2 tablespoons of olive oil

5 -6 medium sized yellow onions, peeled halved then thinly sliced

A sprig of fresh thyme

¼ cup (60ml) of cognac

2 cups (480ml) of dry white wine

3 (720ml) cups of organic beef broth

8 slices of baguette

1 generous cup (240ml) of Gruyère, grated

Action:

Melt the butter and olive oil in a large pan over medium heat. Add the onions, and the sprig of fresh thyme – stir well to coat all the onions, turn the heat down to very low and cook, stirring occasionally until they’re caramelized, golden and meltingly soft. This can take up to an hour.

Crank up the heat and pour in the cognac. Stir for several minutes until it has mostly evaporated then add the wine and continue to cook until the liquid has reduced to a syrupy consistency – approx 6-8 minutes.

Pour in the broth and reduce the heat to medium-low. Simmer for 20-30 minutes.

For the croutons:

Allowing two slices per serving that will fit the top of each soup bowl; toast the slices of baguette and preheat the broiler.

To serve – leaving enough room for the croutons, divide the hot soup evenly into oven-safe soup bowls, place the baguette slices on top, scatter with the Gruyère and stick under a hot grill/broiler until the bread is nicely browned and the cheese is bubbling.

Posted in Soups | 4 Comments

Recipe: Spiced, Lacquered Duck

Almost everyone I speak with tells me they’ve never cooked a duck which is a pity, as they’re delicious and no more challenging than roasting a chicken – with added benefits.

This recipe is impressive, drop dead easy and if you haven’t yet decided what to cook for Christmas dinner – try this for a change.

Most supermarkets will at the very least have oven-ready frozen duck if you can’t find a fresh one. You’ll have to remove the giblets from the cavity along with any nasty little plastic packet labeled ‘orange sauce mix’ that sometimes lurks in there and which I recommend dumping.

The liver is a treat in itself; pan fried and eaten on hot buttered toast with some cranberry relish. Make a stock with the remaining giblets then give everything but the neck to your dog.

Anyway, back to the duck; before I do anything at all, I trim off the excess skin and fat from both cavity ends, cut them into small pieces and render over a low heat in a wide pan. It takes about an hour and you’ll need to occasionally press down on the bits with the back of a spoon. What you’ll end up with is the most glorious fat for roasting potatoes, parsnips, sauteing cabbage, etc. Blog, rendered duckfat

Potatoes roasted in duck fat taste superior to any other type of roast potato. Duck fat freezes well and you can munch on the crispy little bits left over in the pan after you’ve strained the fat off – a million miles better than those store-bought packets of pork rinds that some folks like to chomp on.

So, now you have some rendered duck fat and a whole, defrosted or fresh duck with a clean cavity.

You do need to start 2 days ahead as you have to marinade the duck first; otherwise this is foolproof and absolutely wonderful.

Serve it with rice – I like to serve it with ‘Pulao Rice with Saffron, Dried Fruits & Almonds’ – or perhaps some potatoes you’ve roasted in the rendered fat and a green veg on the side such as steamed Brussels sprouts with Chestnuts. The duck meat should be slightly pink.

BLOG, Roasted spiced lacquered duck

SPICED LACQUERED DUCK

(Serves 4)

You’ll need an oven-ready duck (fresh or defrosted) weighing 5 lbs / 2.26 kilos

Ingredients for the marinade:

1 cup (8 fl oz / 228ml) of tamari or soy sauce

2 tablespoons of dry sherry

2 tablespoons of packed soft brown sugar

2 tablespoons of honey

2 tablespoons of Hoisin sauce

2 large cloves of garlic, minced

1 tablespoon of toasted sesame oil

1 teaspoon of Chinese 5-Spice powder

½ a teaspoon of cayenne

Action:

BLOG, marinaded DuckCombine all the marinade ingredients together and marinade the duck in a sealed container for 48 hours, turning over at least twice each day.

Pre-heat the oven to 400F / 200C.

Remove the duck from the marinade – discard the marinade. Drain the duck really well and pat it dry inside and out with paper towels.

In a deep sided roasting pan on a rack, roast the duck for 45 minutes, breast side up. Turn over and roast for another 15 minutes until it’s a lovely deep brown. Carefully drain the liquid from the cavity and tent the duck with foil – allow it to rest for 20 minutes before carving.BLOG, sliced roast lacquered duck

Note: the fat that has collected in the bottom of the pan can be strained and frozen as well – it would be great for making stir-fried rice or a spicier type of roast potato.

Posted in Indian & Asian Cuisine, Poultry | 4 Comments

Recipe: Pulao with Saffron, Almonds & Dried Fruit

This luxurious Indian/Pakistani dried fruit and saffron pulao dish is usually reserved for special occasions. It also goes brilliantly with baked ham, roast goose, spiced lacquered duck, turkey, or any other roast fowl and it makes a lovely change from potatoes etc.

You can use any long grain rice but I recommend fragrant Himalayan basmati rice for the best results. If you can’t find good quality Spanish saffron, leave it (and the milk) out of the recipe and make up the difference with extra water and 1 teaspoon of yellow food coloring.

*Don’t confuse the royal cumin with regular cumin. If you can’t find royal cumin, leave it out as it’s an entirely different spice.

If you don’t have access to an Asian supermarket, http://a1spiceworld.com is a great online source for spices.

You’ll need a heavy saucepan with a tight fitting lid.

Pulao with Dried Fruit, Saffron & Almonds

PULAO with SAFFRON, DRIED FRUITS & ALMONDS

(Serves 4-6)

Ingredients:

½ teaspoon of Spanish saffron threads

3 fl oz (75ml) of hot milk

2 oz (50g) of unsalted butter

6 green cardamom pods, slightly split open

4 whole cloves

*1 teaspoon of royal cumin (aka ‘black’ cumin or ‘shahi jeera’)

Two 2 inch (5cm) sticks of cinnamon, roughly broken

2oz (50g) of slivered/sliced almonds  – or 1 oz (25g) each of slivered almonds and plain unsalted pistachios, coarsely chopped

10 oz (300g) of basmati rice, rinsed thoroughly under running water for a minute then soaked in a large bowl of water for 30 minutes, drained

1 oz (25g) of ready-to-eat dried apricots, sliced

1 oz (25g) of golden raisins

1/2 to 3/4 teaspoon of sea salt

18 fl oz (525ml) of warm water

Action:

Wash, soak and drain the rice first.

Dry roast the saffron in a heavy pan for a minute or so until it turns one or two shades darker – watch it carefully as you don’t want it to burn. Pound the saffron in a pestle and mortar and pour over the hot milk – set it aside to soak.

(If you don’t have a pestle and mortar, crumble the saffron into the milk with a couple of spoons. It’s worthwhile buying a small pestle and mortar and most kitchen shops sell them).

Heat the unsalted butter in the saucepan until it’s foamy – add the cardamom, royal cumin, cinnamon and cloves. Stir-fry for 15 seconds.

Add the sliced almonds/pistachios and stir-fry for another 30 seconds then add the rice, apricots, raisins, salt and saffron milk (make sure you include all the saffron  strands) and give it a good stir.

Add the warm water, bring it to a boil, cover with a tight fitting lid and reduce the heat to very low. Allow it to cook completely undisturbed for 12 minutes then take it off the heat and let it rest for another 12-15 minutes. Do NOT be tempted to take the lid off until the resting time is up – the steaming process is essential for perfectly separated rice grains. Once the resting time is up, take the lid off and fluff everything with a fork to serve.

You can make this ahead –  tip everything into a serving dish, dot it with a little extra butter, cover tightly with heavy duty foil then warm through in a low oven. It also freezes well.

The whole spices aren’t meant to be eaten but they do look interesting in the serving dish.

(Adapted from a Mridula Baljekar recipe)

Posted in Indian & Asian Cuisine, Vegetables / Vegetarian | 1 Comment

Recipe – Authentic Indian Beef Vindaloo

I’m convinced that very few people have eaten a traditional Vindaloo.

It’s true that many top notch Indian restaurants, especially in the UK serve it as it should be served but having eaten my way around India, I can attest to the fact that some places tend to make an ubiquitous sauce and when an order comes in for vindaloo, they simply throw in extra cayenne.

For those of you unfamiliar with authentic Indian cuisine, vindaloo and the occasional oddly-named ‘tindaloo’, signal fire and spice!

If that isn’t your cup of tea, you should also avoid anything called ‘Bangalore Phall’ at all costs. It arrives at your table smelling deceptively like a rose garden but it will completely immolate the lining of your palate.

Vindaloo is traditionally made with pork and has a vinegar-onion-garlic base, thanks to the Portuguese influence that still prevails in Southern India. Generally speaking, the further south you go (in India), the spicier the food. If you like those creamy, almondy sauces, then stick to Kashmiri-style recipes.

Against my usual trend of offering quick and easy recipes, I have to be honest and tell you that although this doesn’t require special skills, it is time-consuming.

The good news is that the vindaloo paste can be made in larger quantities and frozen, so whenever you fancy a shrimp, chicken, lamb or beef vindaloo (as offered here) most of the work has been done.

You can adjust the level of heat by cutting back or increasing the amount of dried chili but I guarantee that the foulest of moods will be instantly lifted by the aroma of the ground whole spices.

Serve with piles of fluffy white rice and a well-chilled pale beer.

You’ll need a spice/coffee grinder and a food processor. Asian supermarkets and Wholefoods sell many of the spices listed below but failing that, A1Spiceworld.com is an excellent source of everything you’ll need.

BLOG beef vindaloo,

BEEF VINDALOO

(Serves 6)

Ingredients for the vindaloo paste:

2 teaspoons of whole cumin seeds

1-4 hot, dried red chilies (adjust to taste)

1 teaspoon of whole black peppercorns

1 teaspoon of cardamom seeds (or crack open whole cardamoms pods and remove the seeds)

A 3 inch (76mm) stick of cinnamon (don’t substitute ground cinnamon)

1 ½ teaspoons of black mustard seeds

1 teaspoon of whole fenugreek seeds

5 tablespoons of white wine vinegar

1 ½ – 2 teaspoons of sea salt

1 teaspoon of light brown sugar

7 oz (199g) of onions, sliced thinly

10 tablespoons of vegetable oil (I prefer grape-seed oil)

4-6 tablespoons of water – plus 8 fl oz (225ml)

Action:

Grind the first seven ingredients in a spice grinder (spices only). Put them in a bowl, add the vinegar, salt and sugar, stir well then set aside.

Heat the oil in a wide heavy pan over medium heat. Add the onions and fry them, stirring frequently until they’re crisp and golden. This can take approx 45 minutes and you need to be vigilant as any burned black onion will taint the dish and they’ll turn brown quite quickly towards the end.

Remove with a slotted spoon and puree them in a food processor along with 2-3 tablespoons of water. Keep the oil for the next stage.

Add the onion puree to the spice mixture and this is your basic vindaloo paste. You can freeze it at this point.

Now for the vindaloo itself:

Ingredients:

2lbs of lean beef (lamb, pork, or small skinned chicken pieces on the bone), cut into 1inch (2.5cm) chunks and patted dry

1 inch (2.5cm) cube of peeled fresh ginger

A smallish whole head of garlic, cloves separated and peeled

1 tablespoon of ground coriander seed

½ teaspoon of ground turmeric

Action:

Process the ginger, garlic and 2-3 tablespoons of water until you have a smooth paste.

Heat the remaining oil over medium heat and add the meat a few pieces at a time to brown lightly (overcrowding will cause them to steam, not brown). Remove with a slotted spoon and place in a bowl until all the meat is done this way.

Turn the heat down a bit and add the ginger/garlic paste to the pan stir for half a minute then add the turmeric and ground coriander – stir for another 30 seconds.

Add the meat, any accumulated juices, the vindaloo paste and 8 fl oz (225ml) of water. Bring to a boil, cover, reduce the heat to a simmer and cook until the meat is very tender, stirring occasionally. This can take up to 2 hrs so you could put everything in a slow cooker or in the oven on a low heat. Check occasionally to ensure the meat is tender.

As with many Indian dishes, this will taste better if made 2-3 days ahead and kept covered in the fridge. I often make the entire dish weeks ahead and freeze the lot, as freezing really enhances the spices.

(A classic Madhur Jaffrey recipe)

Posted in Indian & Asian Cuisine, Meat | Leave a comment

Recipe: Oven Roasted Cauliflower with Indian Spices

There don’t seem to be too many exciting recipes out there for cauliflower, asides from numerous variations of ‘au gratin’, puréed soups and the like.

I like to eat cauli raw with a hot buttery anchovy-garlic (bagna cauda) dip but it isn’t exactly vibrant-looking on it’s own.

Here’s a recipe that combines the sweet concentrated flavor of a roasted vegetable with Indian spices and a squeeze of lemon – a healthy and visually more appealing way of serving up good old cauliflower that makes a great side dish for any meat or chicken and will also accompany Indian food even though it’s not a traditional Indian recipe.

I haven’t included it here but you could also add a pinch of turmeric to the ground spices. This will give it an extra shot of color, plus turmeric is extremely beneficial, health-wise.

For an authentic Indian meal, I recommend serving it with Chicken in a Spicy Red Pepper Sauce , Chana Dal with spiced basmati rice and spinach with onions, chili and ginger.

Roasted Cauliflower with Indian Spices

Roasted Cauliflower with Indian Spices

ROASTED CAULIFLOWER with CUMIN, CORIANDER, GARLIC & CHILI

(Serves 4 as a side)

Ingredients:

1 head of cauliflower – outer green leaves removed and broken into florets

Sea salt

2 tablespoons of light olive oil or grapeseed oil (grapeseed oil is best for hi-temp cooking)

2 teaspoons cumin seeds

2 teaspoons coriander seeds

1-2 dried red chilies

1 fat clove of garlic, finely chopped

½ cup of blanched almonds, coarsely crushed

Finely grated zest and juice of 1 lemon

Action:

Bring a large pan of lightly salted water to a boil and drop the cauliflower florets in there for 2 minutes to blanch them. Drain and allow to completely dry. Once dry, toss the florets in the olive oil, lemon zest and chopped garlic. Set aside.

Preheat the oven to 200°C/400°F and place a shallow roasting tray in there to heat up.

On the stovetop, heat a heavy skillet and dry-roast the cumin and coriander seeds until they’re slightly darker and becoming fragrant. Add them to the dried chilies with a pinch of sea salt and grind everything in a pestle and mortar (or spice grinder, but not too finely).

Now dry roast the almonds until they become just a bit golden then add them to the cauliflower along with the crushed spices.

Toss everything around to give the cauli a good coating then tip into the preheated pan… roast, turning once or twice for 15-18 mins, or until they start to get tinged brown in places.

Serve immediately with a squeeze of lemon juice.

(Adapted from a Jamie Oliver recipe)

Posted in Indian & Asian Cuisine, Made in Under 30 mins, Vegan, Vegetables / Vegetarian | 2 Comments

Recipe – Chicken Liver Mousse Pâté

As a lifelong fan of every variety of liver pâté (duck, goose, chicken) I sometimes forget that it polarizes people; in fact I don’t know anyone who thinks it’s just ‘okay’. You’re either a lover or a hater.

Naturally, I fall into the first category although I’m steering clear of Foie Gras these days because I’m not wild about how they produce it. All haters take heart; the recipe I posted last year for a vegetarian wild mushroom and walnut pâté with glazed cranberries will delight you and your fellow haters. I recommend offering both this festive season.

Back to liver; I have a favorite chicken liver pâté recipe that I’ve been using for decades but I haven’t blogged it as it doesn’t fall into my ‘must be drop-dead-easy’ category. And then I came across this recipe which involves less work and which I prefer. My regular volunteer food tester isn’t a liver lover but even they declared it to be absolutely delicious.

You’ll need a dessert wine such as Sauternes, Muscat de Baumes-de-Venise, or even Icewine. The recipe only requires 2 oz (50ml) of wine which means you’ll have lots left over…delicious with your Traditional English Christmas Pudding or whatever dessert you serve.

BLOG chicken liver mousse pate with Sauternes

CHICKEN LIVER MOUSSE PATÉ with CROSTINI

(Makes 16-20 canapés, or serves 4 as an appetizer)

Ingredients:

1 oz (25g) of butter

14 oz (400g) of chicken livers, cleaned of white membranes

1 clove of garlic, chopped

1 large sprig of fresh rosemary

5 fl oz (142ml) of heavy (double) cream

2 fl oz (50ml) of dessert wine

For the crostini:

2 tablespoons of olive oil

1 small baguette, thinly sliced diagonally

Action:

Heat the butter in a large sauté pan and cook the livers along with the chopped garlic and rosemary sprig stirring occasionally for about 5-8 minutes or until the livers are cooked and just a little pink in the middle. Take off the heat and cool for 10 minutes then discard the rosemary.

In a food processor, blend the livers and garlic and any juices until smooth and while the motor is running, pour in the cream then the wine. Blend thoroughly.

If serving as an appetizer, divide between four small ramekins; otherwise pour into a shallow dish and chill for at least one hour.

If serving in ramekins as an appetizer, gently warm 3 oz (75g) of butter in a small pan until just melted. Gently pour over the pâté leaving the white solids behind. Add a bay leaf, a few peppercorns or a small sprig of rosemary and allow them to set.

For the crostini, brush each slice on both sides with a little olive oil and place under a hot grill turning once until toasted golden – about 1-2 minutes (can be made ahead and stored in an airtight container).

If serving as canapés, spread the pâté onto the crostini and top with a selection of garnishes such as cranberry chutney, flat leaf parsley, baby cornichons (gherkins), sliced black olives or sliced sundried tomatoes.

The pâté can be made up to 2 days ahead – keep it covered and chilled in the fridge.

It probably freezes well but that’s untested as the batch in my freezer has yet to be eaten.

Posted in Poultry, Salads & Appetizers | 2 Comments

Recipe – Chocolate Drenched Grapes

Those of you who’ve been following my blog will know that I’m a rather lazy cook who is always looking to create a delicious result with the minimum of effort.

But it’s not just a matter of laziness, as I’ve been known to create dishes that take days to prepare – it’s the fact that people don’t have the time on their hands today that they did when I was growing up and I want to present delicious food ideas for busy people.

Longer ago than I care to admit, I watched my Mum bake cakes, cookies and desserts for the weekend and her only kitchen equipment consisted of a wooden spoon, large bowl and a fork for whipping egg whites into meringue on a flat plate. No wonder she had strong arms.

Anyway, here’s something that even a child (supervised) of five is capable of making. The combination of chocolate with fruit is always appealing, whether its chocolate covered dried fruits such as prunes or apricots, poached pears with a chocolate sauce… or the ubiquitous choc-dipped strawberry.

Inspired by the latter, here’s something a bit different; chocolate drenched grapes – a chilly sweet explosion in your mouth. You can use green or red grapes (I only had red in my fridge) or both, for a prettier plate. They’re best served cold in order to experience the crisp chocolate shell immediately followed by a burst of chilled grape juice. I first made this decades ago and its just as wonderful today.

Chocolate drenched grapes 001

CHOCOLATE DRENCHED GRAPES

(Serves about 4)

Ingredients:

1 lb (0.5 kilo) of seedless red or green grapes

1 lb (0.5 kilo) of semi-sweet best quality chocolate chips

Action:

Line a baking sheet with parchment.

Cut the grapes into little bunches, rinse and pat dry or air dry (they need to be absolutely dry before dipping)

In the bottom of a double boiler (or use a bowl that fits snugly over a glass Pyrex pan so you can see exactly how the water is behaving) – bring 1 inch (25 cm) of water to a boil then remove it from the heat and tip the chocolate into the bowl or top of the double boiler. Cover this tightly with foil or a lid.

Allow to sit undisturbed for approx 12 minutes or until the chocolate has melted. Give it a good stir.

Dip each bunch of grapes into the chocolate, covering all or some of the grapes. Haphazard is fine. Place each chocolate dipped bunch onto the baking parchment and chill in the fridge until the chocolate is firm.

Posted in Desserts, Gluten Free Desserts, Made in Under 30 mins, Vegan | 9 Comments

Recipe: Winter Fruit Salad of Persimmon, Pomegranate, Clementines & Dates

There I was, surrounded by stacked crates and huge bags of fruit and veg, when my eye settled on a flat box packed with perfectly squat, golden Fuji (aka Fuyu and/or Sharonfruit in the UK) Persimmons, nestled together like tiny pumpkins.

Persimmons always seemed so exotic to me as a child, especially as the only evidence I had of their existence back then was in a Japanese fairytale book that I read and re-read so many times, lingering over a drawing of a juicy Persimmon, willing it to materialize so that I might sink my teeth into it.

My first experience of the real thing was a bit disappointing; probably because it wasn’t ripe. But now, gazing at this abundant display in Costco and armed with the knowledge of how to successfully ripen fruit (stick ’em in a brown paper bag for a few days to allow the natural gasses to be released, until they’re juicy but still firm, with a little jelly-ish heart) – I piled a tray of the golden fruit into my cart.

Then I spied a similar box of Clementines. Now I’m starting to feel really Christmassy. These weren’t those tiny little tangerines of long-ago English Christmases – fragrant but hard to peel, with each containing about 60 seeds so that spitting was in order; nor were they the most lazy of citrus fruits, the Satsuma, whose coarse ungrate-able skin is so loose that the flesh rattles around inside. No, these were Clementines – smooth-skinned, seedless and wonderfully perfumed.

Now on a roll, I bought some Medjool dates as well. Dates have to be the most evocatively Yuletideian fruit of all for me; I’m recalling those long oval boxes, packed with neat rows of impossibly sticky little brown soldiers, still attached to their stalk. What a sweet, glorious mess for a small child to find in their Christmas stocking! I prefer Medjool dates these days.

Then I saw the Pomegranates. Of course, you can buy ready cleaned and packaged Pom seeds nowadays but they’re expensive and where’s the fun factor here? Given the pomegranate a very firm roll-around on your work surface to loosen up the seeds inside. When you halve the fruit and scrape the seeds into a bowl, I recommend wearing an apron as the juice can splatter and stain. It doesn’t take long to remove all the white pithy stuff and you’ll end up with what looks like a bowl full of rubies that will keep covered in the fridge for several days.

So here it is – one of the most luscious winter fruits salads I’ve ever tasted – so naturally rich that it needs no accompaniment in my opinion, other than a glass or two of chilled champagne perhaps.

Persimmon, Date, Pomegranate, Date & Clementine Fruit Salad

Persimmon, Date, Pomegranate, Date & Clementine Fruit Salad

WINTER FRUIT SALAD of PERSIMMONS, POMEGRANATES, DATES & CLEMENTINES

(Serves 4)

4 ripe Fuji (aka Fuyu) Persimmons, stalks carefully cut out; quartered and peeled like an apple then sliced into bite sized pieces

12 fat Medjool dates, stones removed and thinly sliced

The juice of 4 Clementines and the finely grated zest of two

2 generous tablespoons of Pomegranate seeds

Action:

Combine everything together well in a bowl, cover and allow to sit at room temp for a couple of hours or, cover and chill overnight. The juice will have become syrupy and the Persimmon will have a slightly translucent quality. Once you have that, its ready to eat – and its absolutely wonderful!

BLOG, persimmon fruit salad 017

Posted in Desserts, Gluten Free Desserts, Made in Under 30 mins, Vegan | 6 Comments