Recipe – Oven Roasted Brussels Sprouts with Bacon & Walnuts

I’m convinced that Brussels sprouts-haters were force-fed overcooked Brussels as children.

I was lucky in that both my parents were great cooks with high culinary standards and our Brussels were always perfect; ‘al dente’, slightly sweet and nutty-tasting. Tossed in butter with a pinch of freshly grated nutmeg or little nuggets of French chestnuts, they’ve always been my favorite winter vegetable. They’re at their very best once the cold weather sets in; choose the smallest ones with tightly packed leaves.

Nowadays it seems they’ve been rediscovered via the trend of roasting every vegetable known to man. Not that I have anything against roasting vegetables; roasting certainly concentrates the flavor and who doesn’t like those little caramelized, charred bits?

Brussels sprouts and chestnus, blogAlthough lightly steamed Brussels sprouts tossed in butter with chestnuts will always be my first choice, this recipe for roasted Brussels is very good indeed.

I wanted something simple with minimal ingredients (no molasses, maple syrup, garlic, onion, dried cranberries, apples, etc). Brussels sprouts have a great affinity with bacon and the walnuts add a pleasing crunch. You could substitute pine-nuts if you prefer but watch they don’t burn and only add them towards the end.  A dash of really good balsamic vinegar finishes them off nicely – all the sweetness you’ll need.

I recommend using organic, hickory smoked, nitrate-free bacon (for the Brits, the bacon used here is ‘streaky’ – all American bacon comes like that).

BLOG Brussels sprouts roasted with bacon and walnuts 006
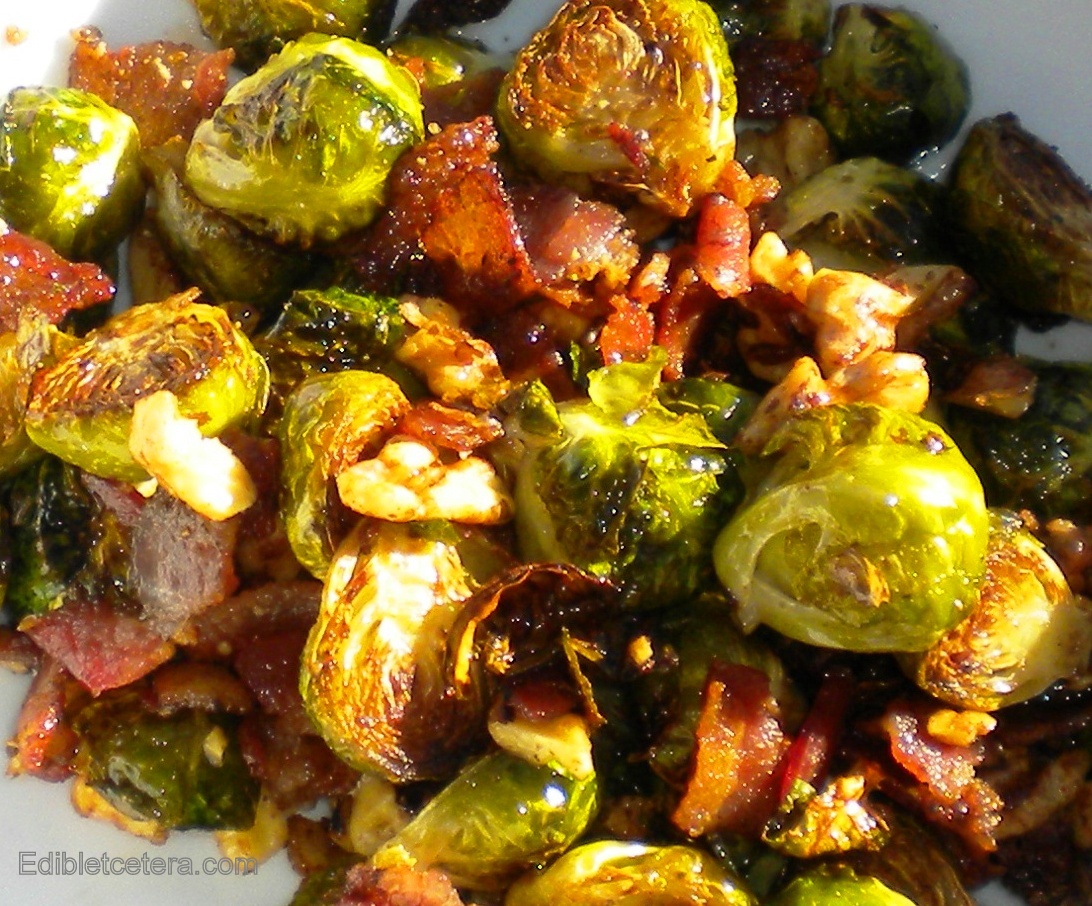
ROASTED BRUSSELS SPROUTS with BACON & WALNUTS

(Serves 4-6)

Ingredients:

1 lb 6 oz (600g) Brussels sprouts

2 oz (55g) hickory smoked bacon, cut into ¾ inch pieces

2 oz (55g) walnut pieces

Sea salt and freshly ground black pepper

Balsamic vinegar to finish

Action:

Preheat the oven to 375F (190°C). Remove any loose or damaged outer leaves from the sprouts and trim the root end – cut each sprout in half lengthways.

Cook the bacon and walnuts in a wide oven-proof sauté pan (no oil needed) over a medium heat, until the bacon just begins to crisp and the walnuts are toasted (about 4-5 minutes). Transfer the bacon and walnuts to a bowl with a slotted spoon and set aside. Add the Brussels sprouts to the bacon fat in the pan, toss them to coat and add a good grind of sea salt and freshly ground black pepper.

Stick the pan in the oven and roast for about 25-30 minutes, tossing them at least once. They should be starting to turn golden brown in patches.  Return the bacon and walnuts to the pan – give everything a good stir and continue to roast for another 10-15 minutes, until the sprouts are golden brown and the bacon is crispy.

Transfer to a warmed serving bowl; drizzle with a little balsamic vinegar and serve immediately.

Posted in Meat, Vegetables / Vegetarian | 4 Comments

Recipe: Mushroom Tart

Here’s a lovely appetizer or light lunch dish that would also make a wonderful vegetarian entrée if you left out the prosciutto – it’s delicious either way.

You could also make it as one large tart but I happen to like individual tarts as I think they’re prettier on the plate.

Using that great shortcut standby, ready-made frozen puff pastry (one of the few processed food items that I’ll occasionally cook with), these only take about 15 minutes to assemble. Rosemary and garlic go brilliantly with mushrooms and the grated Parmigiano-Reggiano along with a dollop of crème fraiche, combine to create a luxurious filling that holds together well.

If you have some, here’s a perfect opportunity to use the duxelles (rich mushroom paste) that you made before and froze in ice-cube trays; the truffle oil, porcini and hint of Madeira will elevate the filling to another mouthwatering level – one tablespoon will do.

With or without duxelles (or prosciutto), these are very good melt-in-the-mouth tarts and I doubt you’ll have much in the way of leftovers.

BLOG mushroom Tart

MUSHROOM TARTS

(Serves 4)

Ingredients:

13-14 oz (375-400g) of frozen puff pastry, thawed

All purpose flour, for dusting

1 oz (28g) butter

11 oz (300g) of assorted wild mushrooms and/or baby portabellas (brown chestnut mushrooms), wiped clean and sliced

1 oz (28g) parmesan, finely grated

1 tablespoon chopped fresh rosemary

1 garlic clove, finely chopped

2 slices of prosciutto, trimmed of fat and chopped (optional)

1 tablespoon of crème fraiche

1 tablespoon of duxelles (optional)

Freshly ground black pepper and sea salt to taste

1 egg, beaten

Action:

Roll the pastry out on a floured surface and cut 4 circles or squares, about 6 inches (15cm) across. Brush the edges with a little beaten egg, then fold in about ½ inch (1.5cm) border around the edge of each tart. Chill them on a lined baking tray in the fridge while you prepare the filling.

Pre-heat the oven to 400F (200C).

Heat a large sauté pan until it’s hot, add the butter then sauté the mushrooms for about 5 mins until they’re cooked through and there’s no liquid left in the pan.

Turn off the heat and season the mushrooms to taste with sea salt and freshly ground black pepper. Add the grated Parmesan, rosemary, garlic, crème fraiche; prosciutto and duxelles (if using).

Take the pastry out of the fridge and spoon the mushroom mixture into the center of each; brush the pastry edges with beaten egg.

Stick the tarts in the oven and bake for about for 20 mins, or until the pastry is puffy and golden.

Serve immediately with a few shavings of good Parmigiano-Reggiano on top.

Posted in Made in Under 30 mins, Meat, Salads & Appetizers, Vegetables / Vegetarian | 4 Comments

Recipe: Pears Poached in Red Wine, Juniper & Cinnamon

Pears are one of my favorite autumn/winter fruits, perhaps because the 60 year old William Pear tree that lives on in my childhood-garden memory didn’t start dropping its heavy golden fruit all over our lawn until mid-to-late September.

I vividly recall fighting off the wasps and grabbing basket-loads of juicy pears for Mum to whip up into a favorite dessert; poached pears swimming in a rich chocolate sauce.

Pears poached in wine are a lot more sophisticated than that long-ago treat and they make a very pretty alternative to those heavy pies and rich desserts usually served around Thanksgiving and Christmas. They have a perfumed, seasonal spiciness and considering how unusually delicious and impressive-looking they are, no-one will guess that it took only minutes to prepare them.

Once cooked, I recommend chilling them overnight in their poaching liquid. Turn them around occasionally so that they absorb the liquid evenly to become a lovely deep pink. I used an old vine Zinfandel; Zin’s have a dark berry quality that works perfectly here – and cooking with cheap rough plonk (wine), will always yield an inferior result.

The syrup reduction can be made up to a couple of hours before serving. The pears will keep in their poaching liquid and continue to improve in the fridge for up to 2 days, freeing you up to do all that last minute crazy kitchen stuff.

I like to serve them with a dollop of crème fraiche and a cinnamon stick but they’re seriously good without any dairy accompaniment. Bosc pears are ideal for this recipe as they hold their shape after cooking.

BLOG Pears poached in red wine & juniper 029PEARS POACHED in RED WINE with JUNIPER & CINNAMON

(Serves 6)

Ingredients:

2 cups (475ml) of good red wine

2 cups (475ml)  of water

1 cup plus 1/2 cup of fine white sugar (355ml measure), divided

15 juniper berries

3 sticks of cinnamon

1/2 teaspoon of sea salt

Six firm, ripe pears (pref Bosc), peeled, left whole and with the stems still attached

Action:

In a pan that’s large enough to hold the pears (but not so big that the liquid is shallow), combine everything except half a cup (118ml measure) of the sugar and the pears. Bring to a boil, whisking until the sugar dissolves, then reduce the heat and simmer gently for 5 mins.

Trim just enough from the bases of the peeled pears so that they’ll stand upright when you serve them. Place the pears in the poaching liquid and cook gently for 10 minutes or until just tender, turning carefully a few times to make sure they cook throughout.

Turn off the heat and allow them to cool in the poaching liquid. Cover and chill overnight (or up to 2 days) turning them over occasionally to ensure that they color evenly. The longer you keep them in the fridge, the deeper they’ll color.

A few hours before you’re ready to serve, remove the pears from the poaching liquid – pour 1 cup (237ml) of the liquid (discard the rest) into a small wide pan, along with the remaining half cup (128ml measure) of sugar and a pinch of salt. Boil for 8-10 minutes, until the liquid has reduced and become syrupy.  Take off the heat and cool.

To serve; pour a small pool of syrup into the bottom of six serving bowls and place a pear on top. Carefully drizzle the remaining syrup on top of each pear and serve with a cinnamon stick and perhaps a spoonful of creme fraiche or whipped cream.

You’ll need a dessert fork as well as a spoon.

Posted in Desserts, Gluten Free Desserts, Vegan | 3 Comments

Recipe: Chicken Braised with Marcona Almonds, Baby Potatoes & Sherry

Anything that involves cooking with sherry always piques my interest and I have Nigel Slater (My British culinary hero) to thank for this recipe. I came across it while reading a review of his latest cook book.

NS is the master of fast and simple good food; his recipes always make my mouth water and this is no exception. Plump chicken thighs, dry sherry, marcona almonds and baby potatoes combine to make a luxuriously simple dish – good enough for a special dinner party.

I tweaked it slightly by adding a handful of pitted green Castelvetrano olives for some color and their mild, fruity quality. If you can’t find them, try something similar or leave them out altogether as the result will be superb either way.

You’ll need to use bone-in chicken thighs with the skin on. These are becoming more and more difficult to find as a result of the growing obsession with a perceived need to cut fat from our diet. (You can find them in Whole Foods, along with the pitted Castelvetrano olives and marcona almonds). You don’t need to eat the skin but because you brown the chicken first, skin is best and the end result will have more flavor.

This recipe is for two – just increase everything accordingly if you’re feeding a crowd. You’ll also need a wide ovenproof pan with a lid.

Chicken Braised with Marcona Almonds, Baby Potatoes, Green Olives & Sherry

Chicken Braised with Marcona Almonds, Baby Potatoes, Green Olives & Sherry

BRAISED CHICKEN with MARCONA ALMONDS, BABY POTATOES & SHERRY

(Serves two)

Ingredients:

4 large chicken thighs – skin on, bone-in

A splash of vegetable oil

7-8 oz (200g) of baby potatoes, skin on

3 oz (80g) of marcona almonds

3.5 fl oz (100ml) of dry sherry

3.5 fl oz (100ml) of water

6-12 pitted Castelvetrano olives (optional)

Fresh chervil (Whole Foods sells this but you can use Italian flat leaf parsley if you can’t find it)

Action:

Season the thighs with a good grind of black pepper and a sprinkle of sea salt. Heat the oil until moderately hot in a wide pan and brown the chicken pieces for about 8 minutes, turning occasionally.

Preheat the oven to 350F (180C).  Halve (if really small) or slice the potatoes into thick coins and add them to the chicken, stirring until the potatoes start to brown. Add the almonds, continuing to sauté until they become golden.

Now add the sherry, crank up the heat a bit and let it all bubble for 30 secs, then add the water and olives (if using). Take off the heat and stir everything gently.

Put a tight lid on it and bake in the oven for 30-40 minutes.

If you like your chicken falling off the bone, turn the heat down to 325F (160C) and give it another 30 minutes but baste the chicken first and make sure you still have enough liquid. If the lid was tight-fitting enough, you should; otherwise add a splash more water.

Sprinkle with chopped fresh chervil to serve – and some al dente brussels sprouts on the side wouldn’t go amiss.

You can make this ahead. Cool, cover and chill, then reheat very gently in a low oven.

Posted in Poultry | Leave a comment

Recipe – Hummus with Sun-Dried Tomatoes & Kale

Here’s one of those drop-dead-easy and delicious appetizers that packs a nutritious punch and only takes 5 minutes to make with a food processor.  Although you can eat it right away, it tastes better after spending a few hours in the fridge. In fact it’s such a tasty no-brainer that I can’t imagine why anyone would bother buying ready-made hummus; this is far more economical to make and anything home-made will be additive free  – and isn’t that what we all want, really?

There’s also the added bonus of not having to force your children (of any age) to eat their greens – the kale blends in really well and if you want to spice it up a bit, add a pinch of cayenne pepper.

Hummus with Kale & Sun -Dried TomatoesHUMMUS with SUN-DRIED TOMATOES & KALE

(Makes approx 1 ½ cups – 360ml)

Ingredients:

One 14 oz (400g) can of chickpeas/garbanzo beans, rinsed and drained

2 tablespoons of tahini (sesame seed paste)

½ teaspoon of sea-salt

2 tablespoons of extra-v olive oil

¼ cup (60ml) water

¼ cup (60ml) of sun-dried tomatoes, drained of oil

Freshly ground black pepper

1/2 teaspoon of finely chopped lemon zest

A bunch of Tuscan (dinosaur) kale, stems and thicker veins discarded, rinsed and roughly torn up

¼ teaspoon of smoked paprika (optional)

Action:

Steam or microwave the kale until its a bit limp and bright green – 2 minutes in the microwave will do it – no need to add water, just put the washed wet kale in a non-metal bowl and nuke it. Squeeze the moisture out of the kale until you have a soft green ball.

Pulse the first 5 ingredients in a food processor – you want it slightly chunky.  Add the sun-dried tomatoes and the kale and pulse until everything is well blended but not too finely chopped. Stir in the smoked paprika if using; give it a good grind of black pepper and add more salt if necessary.

Cover and chill for 2 hrs or overnight to allow the flavors to develop. Serve with your favorite chips, or spread onto bruschetta, topped with a few shreds of sun-dried tomato for a pretty hors-d’oeuvre.

It will keep well in the fridge for about 2 days.

Posted in Made in Under 30 mins, Vegan, Vegetables / Vegetarian | 2 Comments

Recipe – Baked Polenta with Gorgonzola, Goat Cheese, Pesto & Tomatoes

Its that time of year when we crave comfort foods like a steaming bowl of creamy gnocchi or perhaps some pasta with spicy sausage and loads of cheese. In my opinion, polenta falls in the same category but is often overlooked.

This recipe has polenta as a base; topped with oozing melted cheese, fragrant with basil pesto and studded with cherry tomatoes. It’s a satisfying alternative to pasta or risotto and this recipe tastes surprisingly light (not counting calories here, just commenting on the taste) – and extremely good.

All it needs is a salad of you favorite greens with a lemony dressing, or perhaps some steamed broccoli on the side. Or neither.

BTW, if you love polenta, I recommend trying this wonderful version made with butternut squash and sage  – it will go perfectly with your Thanksgiving turkey next month.

So…here’s the featured ‘Dish of the Week’ – comfort on a plate. BTW, its well worth investing in a cast iron ovenproof skillet for this and other dishes such as’ tarte tatin’ or anything that starts on the stovetop, goes in the oven and gets inverted onto a plate. This doesn’t get inverted and is served straight from the skillet…you’ll need to let the hot bubbling cheese settle down a bit before serving – five to 10 minutes should be enough.

BLOG polenta with gorgonzola, tomatoes and pesto 013POLENTA with GORGONZOLA, GOAT CHEESE, TOMATOES & PESTO

(Serves 4-6 as a main course)

Ingredients:

1 tablespoon of extra-v olive oil

1 1/3 (415ml measure) cups of polenta

1 ¼ teaspoons of salt

4 (950ml) cups of water

2 tablespoons of basil pesto (preferably home-made)

2 cups (480ml measure) of halved cherry tomatoes

1 cup (240ml measure) of Gorgonzola, crumbled

1 cup (240ml measure) of soft goat cheese, crumbled

BLOG, polenta with gorgonzola, tomatoes and pesto 005Action:

Pre-heat the oven to 450F (235C), unless you plan to assemble it ahead to cook later.

Brush the inside of an ovenproof skillet with one tablespoon of olive oil – set aside.

Bring the water, polenta and salt to a rolling boil over medium-high heat in a large pan, whisking constantly. I’d wear an oven glove on your whisking hand as its going to spit hot polenta-lava at you.

Continue to cook/whisk for about 3-5 minutes or until the polenta becomes very thick and starts to pull away from the sides of the pan. Turn off the heat, whisk in half of the pesto then pour the lot into the oiled skillet and smooth the top.

Scatter the halved cherry tomatoes over the polenta and dot them all over with the remaining pesto. Top this with the cheeses.

(If you’re going to make it ahead, cover and chill but bring it back to room temp before baking).

Bake in the hot oven until the cheese is bubbling (approx 15-18 minutes).

Cut the polenta into four (or six) and serve it directly from the skillet.

Posted in Made in Under 30 mins, Pasta, Vegetables / Vegetarian | 2 Comments

Recipe: Slow-Braised Lamb Shanks with Cardamom & Prunes

There are many recipes out there for lamb shanks and without exception (unless you use a pressure cooker) they all require a long time in the oven or crock-pot. This is a particular favorite, not only because it’s quick to assemble, it’s also deeply delicious.

And yes, I’m using prunes again. I use them often in the autumn/winter months and there’s no question in my mind that they enhance many meat and game dishes with just the right amount of rich sweetness; the addition of cardamom seeds gives it an exotic fragrance and when garlic is cooked slowly over a few hours, it becomes meltingly sweet and not at all pungent (or repetitive).

Tender lamb shanks with the meat falling off the bone and bathed in a rich sauce will go very well with mashed potatoes. Keep it simple. Unless you fancy pairing it with the ‘Nightshade Pie’  recipe that I posted last week, in which case, offer some hot crusty bread to mop up the juices.

As with many slow-braised meat dishes, this will taste even better the following day so make it ahead and free up your cocktail hour if you’re entertaining at home.

Be sure to carefully pour off the excess fat before you cool and chill it overnight.

Blog Lambshanks 008 edibletcetera

SLOW-BRAISED LAMB SHANKS WITH CARDAMOM & PRUNES

(Serves 4)

Ingredients:

Four lamb shanks weighing approx 1lb (1/2 kilo) each

Six tablespoons of olive oil, divided

One large onion, peeled and thinly sliced

One large carrot, peeled and cut into chunks

6 oz (170g) of pitted prunes

One whole head of garlic, excess paper skin removed then cut in half around its equator

¼ teaspoon of cardamom seeds (from about 5 green cardamom pods)

2 cups (240ml) of beef broth

1 cup (120ml) of chicken broth

Sea salt, freshly ground black pepper

BLOG Lamb shanks with prunes, uncooked 007 edibletceteraAction:

Pre-heat the oven to 325F (160C). Season the lamb on all sides with sea salt and freshly ground black pepper.

Heat 4 tablespoons of the oil in a wide ovenproof pan over medium heat and brown the lamb shanks all over – approx 10 minutes. Transfer the lamb to a plate and add the remaining olive oil to the pan, then add the onion and carrot, sautéing until the onion is golden – another 10 minutes.

Add the prunes, garlic (cut side down) and cardamom; stir for a couple of minutes. Pour in the beef and chicken broth and bring to a boil, then put the lamb back in the pan and cover with a tight fitting lid.

Braise in the oven for 90 minutes – turn the lamb shanks over and put back in the oven for another 90 minutes, by which time the meat should be falling off the bone.

Carefully remove the lamb to a large plate and spoon off the surface fat.

Adjust the seasoning of the pan juices then return the lamb to the pan, ladling the sauce over each piece.

Cool, cover and chill and re-heat gently, spooning the liquid over the meat before serving.

Posted in Meat | Leave a comment

Recipe – Cheesy Baked Eggplant, Tomato & Potato Pie

I like to call this ‘Nightshade Pie’ because tomatoes, eggplants and potatoes are curiously related as members of the Solanum or ‘Nightshade’ family. There’s nothing deadly about this recipe however and it makes a hearty vegetarian main course or one-dish accompaniment to meat that’s perfect for fall.

It goes particularly well with lamb and would be fabulous served with a roast, braised lamb shanks (see next week’s blog); steaks or chops – or even lamb sausages if you can find them. A traditional butcher or your local Whole Foods might make their own sausages, depending on where you live. Lamb sausages are great value but tend to be fatty so if you pan-fry them, use a skillet with a ridged base if possible and cook them slowly over a low heat without any added oil.

Back to this stellar vegetable pie; experiment with your favorite herbs in the tomato/onion part but the combination of fresh rosemary and ground cinnamon is unusually good. Cinnamon goes surprisingly well with tomatoes (as in this Moroccan Spiced Tomato Jam recipe) and shouldn’t be left out.

You can use pecorino, grana padano or any other hard Italian cheese in the pie and the topping is a light, fluffy combination of ricotta cheese beaten with egg. Just add a splash of milk or half & half if it’s a bit too thick to spread.

The entire dish can be prepared ahead up to the point of baking; just cover and chill.

Cheesy Eggplant, Tomato & Potato Pie

Cheesy Eggplant, Tomato & Potato Pie

CHEESY EGGPLANT (Aubergine), POTATO & TOMATO PIE

(Serves 4-6 as a main course / 6-8 as a side dish)

Ingredients:

24 oz (675g) of large baking potatoes, peeled and thinly sliced

3 tablespoons of olive oil

1 medium onion, peeled and thinly sliced

1 fat clove of garlic, crushed or finely minced

½ teaspoon of ground cinnamon

1 teaspoon of chopped fresh rosemary

14 oz (400g) can of chopped Italian tomatoes

2 medium sized eggplants (aubergines) trimmed and sliced lengthways about ¼ inch (1/2cm) thick

3oz (85g) of grated parmigiano reggiano (or pecorino, etc)

1 lb (500g) carton of ricotta cheese

1 egg, lightly beaten

Sea salt, freshly ground black pepper

BLOG potato, eggplant, tomato and cheese bake 004Action:

Pre-heat the oven to 375F (190C). Put the potato slices in a pan and just cover them with lightly salted cold water. Bring to a boil then boil for 5-7 minutes or until slightly tender (don’t overcook them). Drain and set aside.

Heat one tablespoon of the olive oil in a pan and cook the onion and garlic until soft, then add the rosemary, cinnamon and canned tomatoes with their juice. Simmer gently uncovered, until the mixture has thickened slightly. Add sea salt and freshly ground black pepper to taste. Set aside.

Heat a griddle or frying pan until it’s good and hot. Brush the eggplant slices on both sides with the remaining olive oil and cook them for approx 3 minutes each side until they’ve softened and tinged brown in places.

To assemble the dish; spread half of the cooked potato slices in the bottom of a 3 pint (1.5ltr) fairly shallow baking dish. Layer half of the eggplant slices over the potatoes then pour all of the tomato mixture on top, followed by half of the grated cheese. Arrange the remaining potato slices on top of this, followed by the rest of the eggplant.

Whisk the ricotta with the egg (diluted with a little milk or cream if it’s too thick). Spread this all over the pie and sprinkle the remaining cheese on top. You can make it up to 48 hrs ahead to this point – cool, cover and chill.

Bake for approx 45-50 minutes until the topping is golden and slightly puffy and serve while it’s piping hot.

Posted in Vegetables / Vegetarian | Leave a comment

Recipe – Chicken with Olives, Prunes & Sherry

I’m very fond of recipes where the chicken or meat is added to a marinade for a few hours or overnight, then the whole lot is roasted together with minimum fuss.

This is one of those; a particular favorite that originally came from ‘The Silver Palate Cookbook’ and one that I’ve tweaked by replacing the red wine vinegar and white wine with sherry vinegar and Amontillado (dry) sherry. I think it creates a more aromatic result but it’s very good either way if you have the one and can’t be bothered to shop for the other.

The combination of prunes (or dried plums, if you prefer), olives, capers and garlic, results in a wonderfully rich and complex dish that’s just as good served cold, making it perfect for feeding a crowd – but bring it back to room temp before serving if you make it a day or two ahead. It will definitely improve after 24 hrs in the fridge but as its very good eaten straight from the oven, it’s versatile.

You can use any combination of chicken pieces but be sure they’re cut into fairly equal sizes. As always, my preferred joint is the thigh but don’t let that stop you if you prefer chicken breast – they all work beautifully in this dish. Drumsticks might be better for picnic food.

The proportions here will feed a small crowd so reduce the quantities as needed.

Blog Chicken with prunes and sherry vinegar 003

CHICKEN with OLIVES, PRUNES & SHERRY

(Serves 10-12)

Ingredients:

5lbs (2.3k) of chicken pieces, on the bone

For the marinade:

1 whole head of garlic, peeled and crushed

4 tablespoons of dried oregano

Sea salt and freshly ground black pepper

½ cup (118ml) of sherry vinegar

½ cup (118ml) of olive oil

1 cup (237ml measure) of pitted prunes

½ cup (118ml) of pitted black or green olives (but not those tasteless things from a can)

½ cup (118ml) of capers with a tablespoon of their juice

6 dried bay leaves

Just before roasting, add:

1 cup (237ml measure) of soft brown sugar

1 cup (237ml) of dry sherry

A good handful of chopped flat leaf parsley to serve

Action:

Combine all the marinade ingredients and chicken portions in a bowl; cover and refrigerate for 8 hrs or overnight.

Preheat the oven to 350F (180C).

Arrange the chicken pieces in a single layer,  skin side up in one or two roasting pans. Pour all the marinade ingredients over the chicken then sprinkle soft brown sugar over the pieces. Pour the sherry around the chicken.

Roast for 45-60 minutes (depending on the size of the chicken joints), basting with the pan juices every 15 minutes or so; check for done-ness by piercing any thigh piece with a skewer – the juices should run clear when it’s done.

Transfer the chicken to a warmed serving dish with all the prunes, olives and capers scattered around – add some of the pan juices to moisten the chicken and a good sprinkle of chopped parsley over everything to serve.

Otherwise cool it to room temp before adding the parsley if you plan on eating it just slightly warm – or, cover and chill for one or two days. Bring everything back to room temp before serving and make sure you have extra pan juices to pour over as needed.

Posted in Poultry | Leave a comment

Recipe: Pasta with Broccoli, Anchovies, Garlic & Chili

Much as I love baked pasta dishes (like the ones oozing with bechamel sauce, melted cheese and an assortment of wild mushrooms and prosciutto – or a more traditional lasagna verde perhaps), on occasion there’s nothing nicer than a simple pasta dish that takes no more that 20 minutes to prepare.

The fewer the ingredients the better, provided you use only the very best quality; for instance, spaghetti or linguini with garlic, Italian parsley, toasted breadcrumbs, extra virgin olive oil, and the best Parmigiano Reggiano that money can buy …absolutely perfect.

This simple recipe is one of my favorites and combines broccoli, anchovies, garlic, chili, optional sun-dried tomatoes (I used a small squirt of sun-dried tomato paste in a tube here) – and lots of good, hard Italian cheese. Pecorino, Grana Padano and Parmigiano Reggiano all work really well and the end result is delicious and totally satisfying.

There’s nothing fishy-tasting about it and anchovy-phobes will detect just an unidentifiable richness that complements the other ingredients – and just so you know, leaving out the anchovies will result in something that tastes rather flat; not awful but not wonderful either.

blog-pasta-with-broccoli-anchovies-015

SPAGHETTI with BROCCOLI, GARLIC, ANCHOVIES & CHILI

(Serves 4-6)

Ingredients:

1lb (455g) of spaghetti

2 good-sized heads of broccoli, trimmed into equal-sized florets

¼ cup (60ml) of extra virgin olive oil

2oz (56g) of butter

3-4 fat cloves of garlic, chopped

5-6 anchovy fillets, roughly chopped

¼ cup (60ml) of sun-dried tomatoes in oil, drained and sliced (or equivalent sun dried tomato paste)

¼ teaspoon of red chili pepper flakes

Sea salt and freshly ground black pepper

½ – 1 cup (120-240ml measure) of grated or shaved Parmigiano Reggiano cheese (or whatever you prefer, just make sure its Italian and really good)

Action:

Bring a large pan of salted water to the boil and drop in the broccoli. Cook for 4 minutes then remove with a slotted spoon, keeping the water. Drain the broccoli and set it aside.

Cook the spaghetti in the broccoli water according to instructions – it needs to be ‘al dente’.

While the pasta is cooking, heat the olive oil and butter over a medium heat in a large sauté pan. Add the garlic, anchovies and chili flakes – cook for about 5 minutes until the anchovies have dissolved and the garlic is just golden. Add the sun-dried tomatoes and broccoli florets and toss well to heat through -season with sea salt and black pepper to taste.

Drain the pasta quickly then add it to the broccoli in the sauté pan, along with a small amount of the pasta cooking water if it looks a little dry.

Serve in warmed bowls with plenty of grated cheese to pass around.

Posted in Fish & Seafood, Made in Under 30 mins, Pasta | 4 Comments